Thursday, July 29, 2010

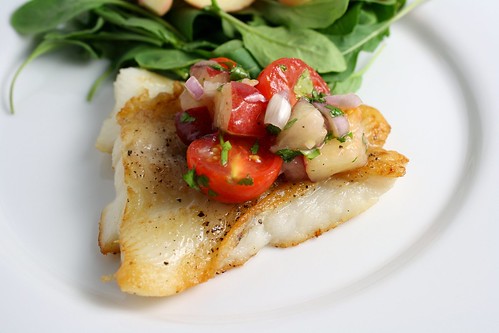
Halibut with Tomato Nectarine Salsa

Halibut with Tomato Nectarine Salsa
As I mentioned in a recent post, I haven't done much cooking this summer. Besides my morning oatmeal, egg, and berries, most of my day is spent grazing on my farmers market finds rather than turning them into delicious food stuffs to share on this site. This past weekend I went to the market hoping to find a little inspiration. I've already had my fair share of the early season tomatoes, but the nectarines were looking great. I was also excited to score a few pieces of Pacific halibut since the fish monger had been out of it in previous weeks. If this recipe seems familiar, it's because I've done a couple of versions of halibut with salsa, but it's a combination that I love and keep coming back to because I can change it up a million different ways. This was a great way to highlight some of my current favorite summer flavors. 
Halibut with Tomato Nectarine Salsa


Halibut with Tomato Nectarine Salsa
(By Esi)

Makes 2 servings

2 firm nectarines, pitted and diced
Small handful grape tomatoes, halved
1 small shallot, diced
2 tablespoons parsley or cilantro
Juice from about 1/2 lemon, or to taste
2 4-ounce halibut filets
Salt and pepper to taste
1 tablespoon extra virgin olive oil

In a small bowl, mix together the nectarines, tomatoes, shallot, and parsley. Add the lemon juice and season with salt and pepper, adjusting the seasonings as necessary.  Let the salsa stand at room temperature for about 10 minutes to allow the flavors to come together.

In a skillet, heat the olive oil over medium high heat. Season both sides of the filets with salt and pepper. Cook for two minutes per side until nicely browned on the outside and just cooked through on the inside.

Serve the halibut warm topped with the salsa.

Printable Recipe

Stumble Upon Toolbar

Monday, July 26, 2010

Manila Machine Tasting 7/17/10

A few months ago, I received an email from my friend Nastassia of Let Me Eat Cake saying she had put in notice at her job and she was going to start a Filipino food truck. I was so excited for her. One of my good friends from college comes from a huge Filipino family and I always love going to their home to load up on goodies like pancit, adobo, and of course lumpia. Unfortunately, it's a little hard for me to chase down food trucks so I was happy that Abby of Pleasure Palate invited me to a special tasting of all the truck's goodness.

The Manila Machine

Nastassia and Marvin

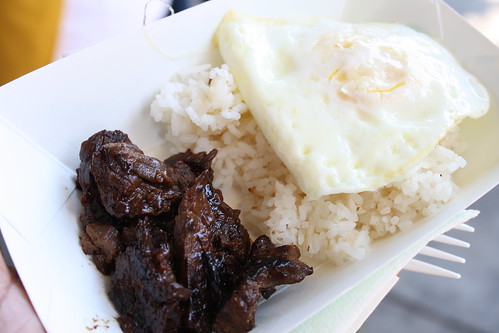
Our first course was tapsilog which was served with garlic fried rice and a fried egg. I always prefer savory breakfasts and this was no exception. Plus, a dash of Filipino hot sauce gave this a nice heat that had nothing to do with the 95 degree temperature outside.

Tapsilog

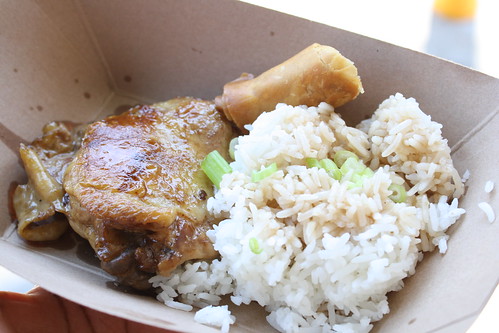
Next we had lumpiang shanghai and chicken adobo. To me, lumpia is one of the best foods ever. I could eat it all day every day. The Manila Machine's lumpia is nice and crispy on the outside and full of pork greatness on the inside. I loved it. Nastassia's partner is Marvin of Burnt Lumpia. He explained that there are many, many versions of adobo and this is their take. I happened to think it was just the right blend of vinegar and spices.

Chicken Adobo and Lumpiang Shanghai

Longganisa is a type of sausage that Nastassia and Marvin put into a pan de sal bun and top with arugula, onions, and mango jam. It's sweet, salty, and fresh all at the same time. I didn't get a picture of it though.

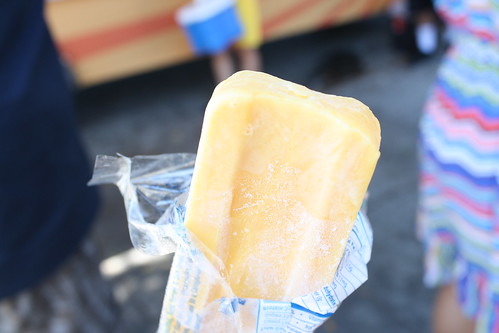
To cleanse our palates, and as a nice birthday surprise for me, Nastassia treated us all to popsicles. The cool and creamy mango popsicle was perfect on that very hot day.

Mango Popsicle

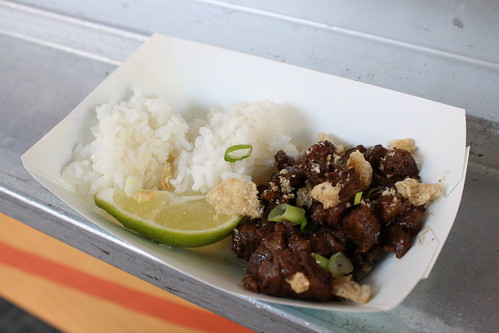
My favorite dish of the day was the sisig. It's pork cheeks marinated in calamansi and served over rice. It was sprinkled with chicharones and with a spritz of lime juice, I was in pork cheek heaven.

Sisig

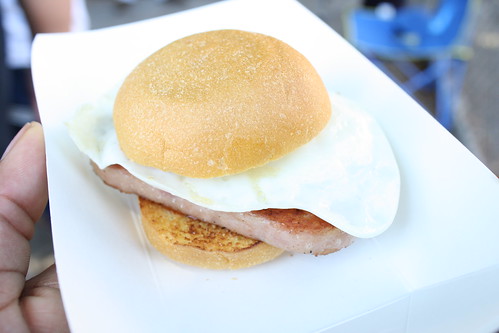
I consider myself to be a slightly adventurous eater, but I've never really wrapped my head around Spam. However, it was on the menu so spam on. The Manila Machine takes a chunk of spam, sears it, then tops it with a fried egg on a pan de sal roll with banana ketchup. It's that great combo of sweet and salty and I actually liked it even though it was a little difficult to eat with the egg sliding around.

Spam Slider

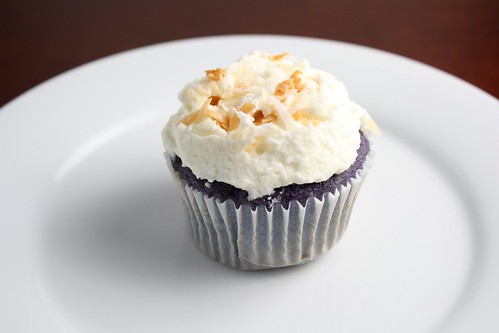
We had to leave early because I am a gal on the go lately, but Nastassia quickly whipped up some turon for my sister and I and gave us our ube cupcakes to go. The turon is basically a banana spring roll and topped with a caramel sauce. This sweet treat would go well with vanilla ice cream. The ube cupcake is pretty to look at and tastes even better. Love the coconut frosting on top!  Unfortunately, since we left early, we missed the adobo glazed chicken wings, but I hear they were stellar.

Turon

Ube Cupcake

It was totally worth it to brave the hot, hot heat and try the delicious food the Manila Machine has to offer.  If you're in Los Angeles, I highly recommend tracking them down.

The Manila Machine Website
Follow them on Twitter @ManilaMachine

Stumble Upon Toolbar

Tuesday, July 20, 2010

Dirty Thirty

cake

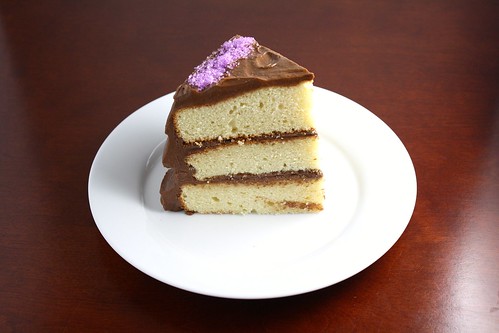
I'm 30 today. So far it's pretty awesome. I baked myself a cake and that was pretty awesome too.


(Thanks to Cube and Sam Kim for the cake suggestion and to Allison for the frosting suggestion)

Yellow Cake
(From The Craft of Baking)


12 tablespoons unsalted butter, at room temperature, plus extra for the pans
1 3/4 cup sugar, divided
1 1/2 teaspoons vanilla extract
7 large egg yolks
3 cups cake flour
1 teaspoon kosher salt
3/4 teaspoon baking soda
1 cup plus 2 tablespoons sour cream
7 large egg whites

Butter the bottoms and sides of three 8 or 9-inch cake pans. Line the bottom of the pans with parchment paper and then butter the top of the paper. Dust each pan with all-purpose flour and tap out the excess.

Preheat the oven to 350 degrees.

In the bowl of a stand mixer, fitted with the paddle attachment, mix the butter, 1 1/2 cups sugar, and the vanilla extract on medium speed, scraping down the sides of the bowl several times until pale and fluffy, about 5 minutes.   Add the egg yolks one at a time, letting each become incorporated into the batter before adding the next.

In a medium bowl, sift together the flour, salt, and baking soda. Reduce the mixer to low speed and alternate adding the flour mixture and the sour cream to the butter mixture, adding one third of each at a time and letting them fully mix in before adding the next. When all of the flour mixture, and the sour cream have been added, turn the mixer to medium-high speed and mix for about 2 minutes to fully incorporate the ingredients.

Add the egg whites to a large, glass mixing bowl. Using a handheld mixer, whip until the egg whites are frothy. While mixing, slowly pour in the remaining 1/4 cup of sugar, and mix until the egg whites have soft peaks. Fold the egg whites into the cake batter in 3 additions.

Divide the batter between the three prepared pans and place the pans on baking sheets. Bake the cakes, rotating the pans halfway through until they are lightly golden on top, gently bounce back when touched, and a toothpick inserted in the center of the cake comes out clean, about 25-30 minutes.

Let the cakes cool in the pan for a half hour before turning out to a wire rack to cool completely. Wait until the cakes have cooled completely before frosting.

Chocolate Frosting
(From Magnolia Bakery)

1 1/2 cups unsalted butter, at room temperature
2 tablespoons milk
9 ounces semi sweet chocolate, roughly chopped
1 teaspoon vanilla extract
2 1/4 cups confectioner's sugar, sifted

Melt the chocolate in a glass bowl placed over a saucepan of simmering water, stirring occasionally until no pieces of chocolate remain. Remove from the heat, and set aside to cool.

In a stand mixer, fitted with the paddle attachment, beat the butter until light and fluffy, about 3 minutes.  Carefully add the milk and beat until smooth.  Add the melted chocolate and beat for another 2 minutes. Add the vanilla and beat for another 3 minutes. Turn the mixer to low speed and gradually add the confectioner's sugar until the mixture is creamy and of the desired consistency.

To ice the cake, use a serrated knife to cut the tops of each layer so that they are even. Place one layer on a cake plate and spread the top with 3/4 cup of buttercream. Repeat with the second layer. Place the third layer on top. Using an offset spatula, spread the remaining buttercream over the entire cake.

Printable Recipe

Stumble Upon Toolbar

Thursday, July 15, 2010

Red Pistou Pasta with Shrimp and Herbes de Provence Crumbs

Red Pistou Pasta with Shrimp and Herbes de Provence Crumbs

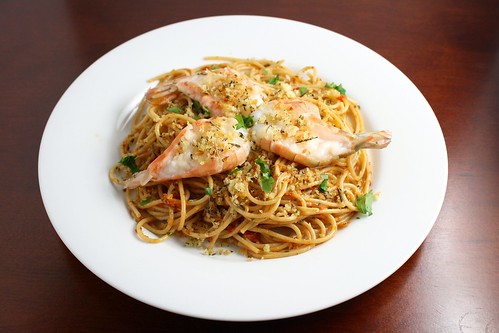
Dear friends, I promise, I haven't abandoned my blog. Thank you to those that emailed me your concerns. Unfortunately, computer problems and the craziness of summer have caught up to me and that's why it's been so long since my last post. I hope you can forgive me. Fortunately, I have this really delicious and simple recipe that is perfect for when you don't feel like doing a lot of cooking in the summer time.  A pistou is basically the same thing as pesto, but without the pine nuts. I loved the idea of making a tomato based version and while I loved this, I definitely would ramp up the tomato flavor next time with either slow roasted tomatoes or tomato paste. The herbes de Provence breadcrumbs put this dish over the top. They take two seconds to make, but add so much flavor I could probably eat handfuls of the crumbs on their own. To make this ever so slightly healthier, I used whole wheat pasta and a touch less oil, but even less oil would probably be fine as long as you up the amount of pasta water to keep the pasta moist. This is a great dish for a quick weeknight dinner, and the leftovers are just as great for lunch the next day. It's filling without feeling heavy. With a nice green salad, you've got yourself a great meal.


Red Pistou Pasta with Shrimp and Herbes de Provence Crumbs
(Adpated from Serious Eats)


Makes 2-3 servings

For the pasta and pistou:
8 ounces spaghetti
1/2 cup sundried tomatoes in olive oil
1 tablespoon oil from the sun dried tomatoes
3/4 cup basil leaves
1 tablespoon extra virgin olive oil
2 garlic cloves, roughly chopped
1/4 teaspoon sugar
Zest 1/2 lemon
2 teaspoons lemon juice
2 tablespoons Parmesan cheese, grated
Salt to taste

For the Herbes de Provence Crumbs:
3/4 cup baguette crumbs
1 tablespoon extra-virgin olive oil
Heaping 1/2 teaspoon Herbes de Provence
1/4 teaspoon salt, or to taste

Bring a large pot of water to a boil and add a healthy pinch of salt. Add the pasta and cook to al dente, about 10-11 minutes for whole wheat pasta.

Meanwhile, combine the sundried tomatoes, basil, oils, garlic, sugar, lemon zest and juice in a small food processor. Pulse until smooth and the mixture resembles pesto. Stir in the Parmesan cheese and season with salt to taste. Transfer the pistou to a large bowl.

While you're cooking the pasta, makes the crumbs by heating the olive oil in a nonstick pan over medium heat. Add the bread crumbs, Herbes de Provence, and salt and cook until the bread is toasted and crunchy.

Drain the pasta and reserve a half cup of the pasta water. Toss the pasta with the pistou and add more water if it is too dry. Top the pasta with cooked shrimp if desired and a healthy handful of the Herbes de Provence crumbs.

Printable Recipe

Stumble Upon Toolbar

Tuesday, July 6, 2010

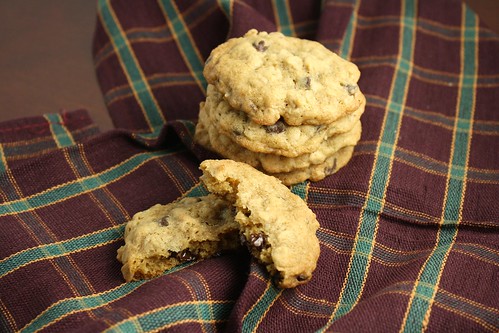
Oatmeal Chocolate Chip Cookies

Oatmeal Chocolate Chip Cookies


A few weeks ago when I was a cookie baking fool, this is one of the batches I baked up. This is your standard oatmeal cookie, but I often find comfort in simplicity so I thought they were great. I think next time I would jazz them up by adding a touch of cinnamon or some other spice, but otherwise, these are perfectly fine as is. I must say that after this cookie project, I'm definitely becoming a bigger fan of baking cookies which to me have always seemed a bit boring in the past. I think there is room for trial and error and a chance to make something ordinary into something extraordinary!


Oatmeal Chocolate Chip Cookies
(From The Parsley Thief)


Makes about 4 dozen cookies

2 cups all purpose flour
2 cups old fashioned oats
1 teaspoon baking soda
1/2 teaspoon baking powder
1/2 teaspoon salt
1 cup unsalted butter, at room temperature
3/4 cup sugar
3/4 cup plus 2 tablespoons (packed) dark brown sugar
2 large eggs
1 teaspoon vanilla extract
1 1/2 cups mini semisweet chocolate chips

Preheat the oven to 350 degrees

In a medium bowl, whisk together the flour, oats, baking soda, baking powder, and salt.

In the bowl of an electric mixer fitted with the paddle attachment, cream together the butter and both sugars until light and fluffy, about 2-3 minutes. Add the flour and oat mixture into the butter and sugar and mix until just incorporated. Fold in the chocolate chips by hand.

Scoop the dough out by the tablespoon-full onto parchment or foil lined baking sheets. Bake 10-12 minutes, rotating the pan halfway through. Let the cookies cool on a wire rack.

Printable Recipe

Stumble Upon Toolbar

Friday, July 2, 2010

Strawberry Basil Frozen Yogurt

Strawberry Basil Frozen Yogurt


I'm fully aware that I just made a frozen strawberry dessert just a few weeks ago, but I came across this frozen yogurt recipe and couldn't resist. It's like Gaby's lemonade in frozen form and it rocks my socks. A few years ago when Pinkberry opened, I went through quite the frozen yogurt faze. After a while, I kind of got tired of it, but lately, I am feeling the frozen yogurt love again. Of course it's always cheaper to make it at home so that's what I did a few days ago. This sorbet is so refreshing and even though it hasn't been very hot lately, it's a great recipe to cool down with. It's tart and tangy and not too sweet letting the flavors of the fruit and basil really be the stars. For me, this is what summer cooking is all about because who really wants to be sweating over a stove when there is fun to be had?! Have a happy and safe 4th of July weekend!


Strawberry Basil Frozen Yogurt
(Adapted from My Gourmet Connection)


Makes about 1 quart

1 1/2 cups nonfat Greek yogurt
6 tablespoons sugar
3/4 teaspoon vanilla extract
1 1/2 teaspoons balsamic vinegar
8 ounces strawberries, washed and roughly chopped
1/2 cup loosely packed fresh basil leaves

In a large bowl, mix the Greek yogurt, sugar, vanila, and balsamic until well combined.

In a small food processor, pulse the strawberries until pureed. Add the basil and pulse until chopped, but you can still see pieces of the green. Add the strawberries to the yogurt mixture and refrigerate for at least an hour until chilled.

Transfer the mixture to the ice cream maker and freeze according to manufacturer's instructions. Transfer to a container and freeze for another 2-4 hours before serving.

Printable Recipe

Stumble Upon Toolbar

Thursday, July 1, 2010

Crepes

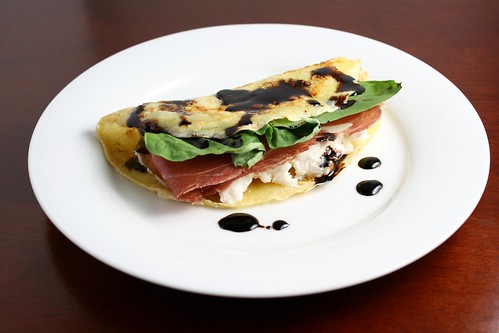
Prosciutto Mozzarella and Basil Crepes with Balsamic Reduction

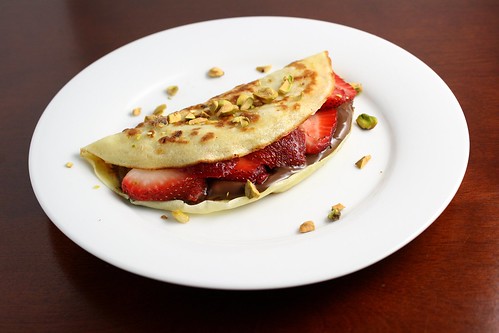
Yesterday I went out for crepes. Though they were delicious, I felt a little guilty because I had recently discovered how easy it is to make crepes at home. When I made my own I did a mix of sweet and savory crepes. The savory filings were leftover from my poached eggs with prosciutto and basil. I topped them with a bit of balsamic reduction and the sweet, tart sauce was a perfect compliment to the creamy cheese and salty prosciutto. As you know, I'm obsessed with strawberries and Nutella so it was only natural to stuff that combination into a crepe. I love the added crunch of the pistachios. Besides the endless flavors you can put into crepes, one of the best things about making your own is that you won't have to stand in long lines to get your fix. What are some of your favorite crepe fillings?

Strawberry and Nutella Crepes


Crepes
(From Closet Cooking)


Makes about 6 8-inch crepes

1/2 cup flour
1 egg
3/4 cup milk
1/8 teaspoon salt
1 tablespoon butter, melted plus extra for the pan

Mix all the ingredients together in a bowl. Preheat an 8-inch pan over medium heat and brush with a bit of butter. Using a quarter cup measure, pour the batter in the pan and swirl the pan around so that the mixture evenly coats the bottom of the pan. Cook for about 2 minutes until the crepe has browned on the bottom. Flip, and cook for another 2 minutes until the other side has browned.

Printable Recipe

Stumble Upon Toolbar