Saturday, February 28, 2009

Daring Bakers: Chocolate Valentino

Would you guys believe me if I told you that I am not perfect? I know, I know...hard to believe, but it's true.


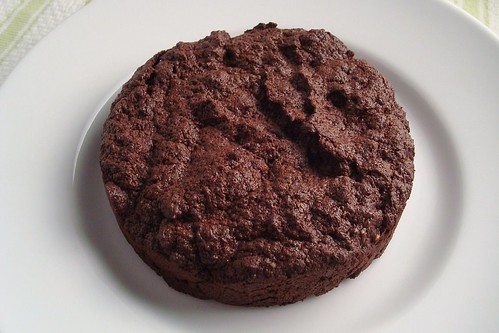
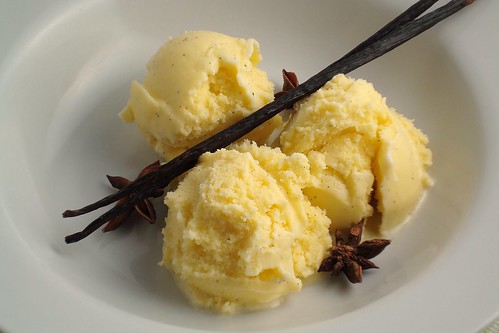
The February 2009 challenge is hosted by Wendy of WMPE's blog and Dharm of Dad ~ Baker & Chef. They have chosen a Chocolate Valentino cake by Chef Wan; a Vanilla Ice Cream recipe from Dharm and a Vanilla Ice Cream recipe from Wendy as the challenge.

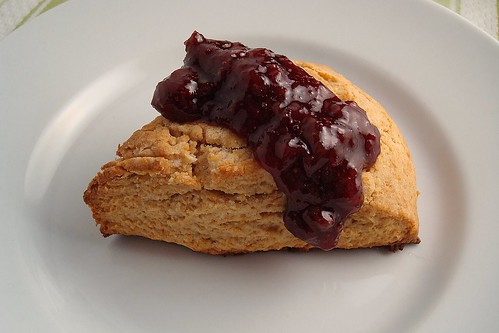
This is my sixth challenge as a Daring Baker. It was bound to happen. I almost feel embarrassed that I FAILED this challenge. I mean, how can you screw up something with only three ingredients? I should have failed at the challenge that had eleventy thousand ingredients. Not this. Oh well, at least I had ice cream to make me feel better.


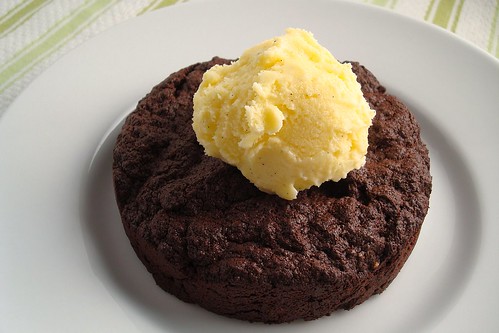
In case you were wondering, a chocolate Valentino is a flourless chocolate cake. We were also challenged to come up with an ice cream accompaniment. I decided to make the cake for my friend's Oscar party. It didn't take very long, but the part where I failed was overwhipping the egg whites. It even says in the recipe. "Do not overwhip the egg whites". You want to know what happens when you overwhip the egg whites? You get a dry, inedible cake which eventually will be introduced to the trash can. There was no way I could serve this at the party. Lesson learned...DO. NOT. OVERWHIP. EGG. WHITES!

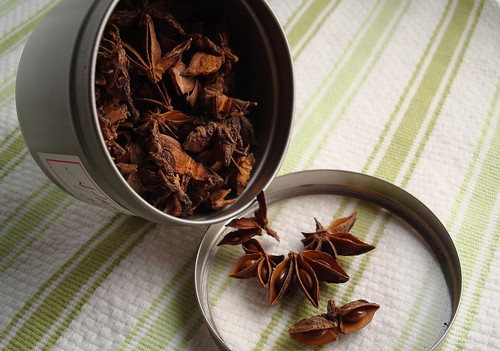
If you missed it, the ice cream (star anise and vanilla bean) recipe is here. Many Daring Baker's cakes turned out beautifully. Visit the blogroll and check them out!
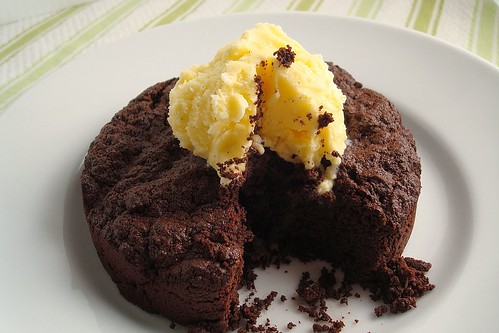

Chocolate Valentino
(From Chef Wan's Sweet Treats: 240 Pastry Recipes from Asia's Most Flamboyant Food Ambassador)

16 ounces (1 pound) (454 grams) of semisweet chocolate, roughly chopped
1/2 cup (1 stick) plus 2 tablespoons (146 grams total) of unsalted butter
5 large eggs separated

Put chocolate and butter in a heatproof bowl and set over a pan of simmering water (the bottom of the bowl should not touch the water) and melt, stirring often.

While your chocolate butter mixture is cooling. Butter your pan and line with a parchment circle then butter the parchment.

Separate the egg yolks from the egg whites and put into two medium/large bowls.

Whip the egg whites in a medium/large grease free bowl until stiff peaks are formed (do not over-whip or the cake will be dry). With the same beater beat the egg yolks together. Add the egg yolks to the cooled chocolate. Fold in 1/3 of the egg whites into the chocolate mixture and follow with remaining 2/3rds. Fold until no white remains without deflating the batter.

Pour batter into prepared pan, the batter should fill the pan 3/4 of the way full, and bake at 375F/190C for 25 minutes until an instant read thermometer reads 140F/60C.

Note – If you do not have an instant read thermometer, the top of the cake will look similar to a brownie and a cake tester will appear wet. Cool cake on a rack for 10 minutes then unmold.

Stumble Upon Toolbar

Thursday, February 26, 2009

Honey Whole Wheat Scones

Warning, this post contains Top Chef finale spoilers. If you haven’t watched the episode, come back after you have. You’ve been warned.


How pissed were you about Hosea winning TC 5? I normally prefer to not comment on the show and leave it up to the experts, but last night’s finale made me so mad, I actually yelled at my TV for about ten minutes after it ended. After the departure of my favorite Italian, I didn’t really have a favorite, but I would have been fine with Stefan who, let’s face it, as cocky as he may be, cooked some pretty amazing food…or even googly eyed Carla who fought her way to the top three with her crazy expressions and cooking with love. I actually think it is quite unfair for the judges to base the decision on who should be Top Chef on just one night of cooking. It kind of negates the fact the cheftestants have been cooking their hearts out for however many weeks. They should change the name of the show to Top Chef…of that night. Ugh. Ok, enough ranting. Remember when I told you guys about this cool tool I recently discovered which has been really amazing in helping me plan my weekly meals. Well, sometimes recipes still sneak their way into my week even though I didn’t plan them. After a particularly stressful pilot season day yesterday, I knew I was going to have to take the edge off with a glass of wine and some good ole arm work of cutting butter into flour. Of course those calming influences were completely ruined from watching TC and my stupid internet going out. Seriously, is anyone else in LA having the same problem of Time Warner cable going out every day around 8:30-9? It is becoming the most frustrating thing to deal with. Last night it lasted for two hours! I should get at least a month free with all the headaches it has caused.

Just call today, Rant Thursday.


I’m not sure how I found this recipe, but I am so glad I did. I am trying to add a little more whole grain to my life so I did this with half whole wheat flour. I also added a pinch of cinnamon for a little something extra. The only sweetness in this recipe comes from the honey so these are a very mild type of scone that go perfectly with strawberry preserves. I am fond of the no pectin variety from Harry’s Berries in Oxnard, CA (think globally, act locally). They are also really good with a piece of cheese (don’t knock it till you try it). I'm a little tired and very stressed this week, so I apologize that it's taking me longer to reply to comments and visit your blogs. Thanks for understanding!


Honey Whole Wheat Scones
(Adapted from The Repressed Pastry Chef)

1 cup all-purpose flour
1 cup white whole wheat flour
1 tablespoon baking powder
1/4 teaspoon salt
One or two dashes cinnamon (optional)
4 tablespoons cold, unsalted butter, cut into pieces
3 tablespoons honey
1 cup heavy cream

Preheat the oven to 400 degrees.

Combine flours, baking powder, salt and cinnamon. Cut in the butter until crumbly. In a small bowl whisk together the honey and the cream, add to the dry ingredients and mix with a spoon until just combined.

Lightly flour a work surface and form the dough into a circle. Cut into eight triangle-shaped pieces and place on a baking sheet lined with parchment paper.

Bake 15-20 minutes or until golden brown on the top. Cool for 5 minutes in pan and then transfer to a rack and cool for another 5 minutes. Serve warm

Stumble Upon Toolbar

Wednesday, February 25, 2009

Roasted Poussin with Braised Romaine

The lovely guy at the farmers market who sells me my amazing eggs also sells these little poussins. A quick search of poussin recipes lead me to this one featured in the New York Times as adapted from the Bar Room at Modern. As I said last week, during these tough economic times, going out to restaurants is becoming less of a reality so finding easy meals to recreate at home for far less is becoming more of a necessity. This is a really good dish. It was my first time preparing a poussin (which, naturally, I did incorrectly...I mean, the day I actually prepare a dish correctly is the day I win a thousand bucks!). This is a delicious recipe and it's fairly straightforward, but in all honesty, I think this is something I would rather go to the restaurant and order. I think something kind of got lost in translation in the home version. I can't quite put my finger on what was missing, but I don't think it was as good as it could have been. This was my first time eating braised romaine, and I really enjoyed it. The dressing is kind of like a warm Cesar salad dressing and really flavorful. In laziness, I left out the shaved Parmesan, but I didn't miss it. Again, this is a really good dish, but it takes some time (I had to cook my poussin longer because I didn't de-bone it), so this could just be something I would order for lunch next time.


Roasted Poussin with Braised Romaine
(Adapted from The Bar Room at Modern as found in the New York Times)

Makes 2 servings

Extra-virgin olive oil
1 poussin, 1 pound (or substitute one-pound Cornish hens), halved and boned except for the wing
1 romaine hearts, split lengthwise
1 teaspoon salted cured anchovy, rinsed, filleted and diced
1/2 - 1 teaspoon minced garlic
1/2 cup rich chicken stock
Fleur de sel and freshly ground and cracked black pepper (I used Kosher salt)
1 teaspoon Dijon mustard
6 seedless, skinless segments of lemon
2 tablespoons extra virgin olive oil
1 ounce shaved Parmesan, for serving (optional)
Lemon wedges for garnish, optional

Preheat oven to 375 degrees. Place a large ovenproof skillet over high heat and add 1 1/2 teaspoons olive oil. Add poussin halves skin side down and sear until well browned. Transfer pan to oven and roast until skin is crispy, 5 to 7 minutes.

While poussin roasts, place a large heavy skillet over high heat until very hot. Add 1 1/2 tablespoons olive oil. When oil is hot, add romaine hearts cut side down and press with a spatula until well browned. Turn hearts over and add anchovies and garlic. Add chicken stock and stir, scraping pan bottom, until stock is reduced by half. Remove pan from heat and use tongs to transfer romaine to a platter lined with paper towels. Season to taste with fleur de sel and ground pepper; reserve pan.

Preheat broiler. Leaving poussins skin side down, brush them with mustard and broil until lightly browned, about 2 minutes. Remove from heat and keep warm. Return skillet to medium heat. Add lemon segments and allow sauce to reduce to a glaze. Remove from heat and whisk in olive oil.

To serve, spread romaine across a large serving platter. Place a couple of shavings of Parmesan over each piece of romaine, and arrange poussin over top. Drizzle sauce around platter and over poussin. Sprinkle with cracked black pepper to taste, and, if desired, garnish with lemon wedges. Serve hot.

Stumble Upon Toolbar

Tuesday, February 24, 2009

French Red Onion Soup

I think I have mentioned it before, but I can't sit still and do just one thing at a time. On Sunday while I was watching the Oscars, I was Twittering and I was also making this soup. I find I can be much more productive this way. Do you guys multitask like this or am I just strange? I love French onion soup, but I don't often find myself with hours to spend over a pot of caramelizing onions. I know it is not traditional to use red onions in this kind of soup, but trust me, it's really good. Since I wasn't sure if my bowls were broiler-safe, I did the toasts on a sheet pan lined with foil. Watch them closely, they really only take a minute or two. Since I didn't want to have an entire baguette for myself, I sliced up a french role. The soup has great flavor and went perfectly with the bread and cheese. This is great, warming food that won't make you feel guilty (just go easy on those cheesy toasts).


French Red Onion Soup
(Adapted from Gourmet, September 2008)

1 cup reduced-sodium chicken broth
1 cup water
1 whole star anise
3 black peppercorns
1 lb red onions, sliced (I used a little over a pound)
1 tablespoon olive oil
Kosher salt
2 tablespoons dry red wine
Baguette or french roll, sliced
Grated Gruyere or Manchego

Bring broth, water, spices, and 1/4 tsp salt to a boil. Remove from heat and let steep 15 minutes.

Meanwhile, cook onions in oil with a pinch salt in a heavy medium pot over medium heat, covered, stirring occasionally, until deep golden, about 15 minutes. Add wine and boil, uncovered, until reduced to 2 Tbsp, about 1 minute. Strain broth through a sieve into onion mixture and briskly simmer, uncovered, 10 minutes. Season with additional salt if necessary.

Preheat broiler.

Place baguette slices on a baking sheet lined with foil and sprinkle each with some of the cheese. Broil about 6 inches from heat until cheese is melted and bubbling, about 2 minutes.

Stumble Upon Toolbar

Monday, February 23, 2009

Star Anise and Vanilla Bean Ice Cream

Oh yes, you read that title correctly. I made star anise and vanilla bean ice cream. I forgot to mention this last week when I made the yogurt sorbet, but one of my 101 goals was to purchase an ice cream maker and make unique ice creams with it. Well, here is another. One of my favorite LA haunts, Cube, recently had a sale and I could not pass up the opportunity of getting some amazing spices at ridiculously cheap prices (haha, I rhymed). I got some star anise, whole cloves, and herbs de Provence for less than 2 bucks an ounce each which is far less expensive than the grocery store price. Plus, they came in really cute packaging. I wasn't planning on making this ice cream. I was actually planning on doing something else, but in a search for what to make with star anise, I came across this and could not pass it up. I dirtied quite a few dishes to make this recipe, but it was so totally worth it. I can't get enough of this ice cream. The anise taste is quite strong and the vanilla bean adds a nice mild flavor. I am just discovering the softer texture of homemade ice cream and I think this ice cream works well as a homemade treat. This is quite the addictive dessert.


Star Anise and Vanilla Bean Ice Cream
(From The Spice House)

2 cups whole milk
1 vanilla bean
2 tablespoons whole star anise
3/4 cup sugar
4 egg yolks
3/4 cup heavy cream

Add the vanilla bean and star anise to the milk. Heat to boiling, cover and remove from heat. Let sit for 20-30 minutes. Scrape the vanilla pod and add the seeds to the milk. Strain the milk through a sieve to remove the star anise.

Beat the egg yolks with the sugar, until thick and pale. Temper the yolks with the warm milk, being careful not to cook the eggs.

Heat the mixture on medium-low heat, stirring constantly. Do not boil. Bring to a consistency that coats the back of a wooden spoon. Remove from heat, strain again, and stir until cool.

Whip the heavy cream to light peaks. Fold whipped cream into the cooled custard and freeze in an ice cream machine according to manufacturer's instructions.

Stumble Upon Toolbar

Sunday, February 22, 2009

Baked Shrimp Scampi

Happy Oscar day!! Are you guys watching the big show? Even though it can be a little boring, I always make time to watch the Oscars. Even before I worked in the movie and television industry, I was a huge fan of the Oscars. Have you guys seen any of the movies nominated? It's one of the first years in recent history that I have made it a point to watch all of the movies nominated for best picture. I think Slumdog will take the cake! It's amazing. I'm still not sure what I will be doing later today in celebration, but if you are looking for an idea of a nice dish to serve, look no further. If you love shrimp and garlic (and really, who doesn't?), you will like this dish. My only complaint was that it was a little heavy on the salt (and for once I measured). Other than that, I really enjoyed the flavors in this recipe. I though that since rosemary can be kind of strong, it would dominate the other flavors, but everything worked really nicely together. Of course, with all that butter, this is definitely a special occasion kind of dish, but aren't the Oscars a special occasion? Happy viewing!


Baked Shrimp Scampi
(Adapted from Ina Garten)

Makes about 3 servings

1 pound of large shrimp, peeled and deveined, tails on
1 tablespoon olive oil
1 tablespoon dry white wine
Kosher salt and freshly ground black pepper
6 tablespoons unsalted butter, at room temperature
2 teaspoons minced garlic
2 tablespoons minced shallot (about 1 large shallot)
1 1/2 tablespoons minced fresh parsley
1/2 teaspoon minced fresh rosemary
Pinch crushed red pepper flakes
1/2 teaspoon grated lemon zest
1 tablespoon freshly squeezed lemon juice
1 large egg yolk
1/3 cup panko
Lemon wedges for serving

Preheat the oven to 425 degrees, F.

Place the shrimp in a mixing bowl and gently toss with the olive oil, wine, 1 teaspoon salt, and 1/2 teaspoon pepper. Allow to sit at room temperature while you make the butter and garlic mixture.

In a small bowl, mash the softened butter with the garlic, shallot, parsley, rosemary, red pepper, lemon zest, lemon juice, egg yolk, panko 1/4 teaspoon salt, and 1/8 teaspoon pepper until combined.

Starting from the outer edge of a 8x8 bowl, arrange the shrimp in a single layer cut side down with the tails curling up and towards the center of the dish. Pour the remaining marinade over the shrimp. Spread the butter mixture evenly over the shrimp. Bake for 10-12 minutes until hot and bubbly. If you like the top browned, place under a broiler for 1 minute. Serve with lemon wedges.

Stumble Upon Toolbar

Friday, February 20, 2009

Egg, Ham, and Spinach Pizza

So guess what I did a few days ago? Made more balls of pizza dough!! This time I used the whole wheat dough recipe from 101 Cookbooks and I added a couple tablespoons of chopped rosemary to the mix. I mostly made the dough because I knew I was going to be making this pizza. I'm really glad I made it because it's really, really, really delicious. It's an Ellie Krieger recipe and it definitely doesn't taste like you are eating lighter. Some of the spinach got a little crispy and it reminded me of the spinach chips I recently saw on Andrea's Cooking Books (I haven't actually tried the recipe yet, but they look so good!). I only cracked one egg onto this for two reasons, one I was just making it to have right away and didn't feel like having more than one egg and secondly, the one egg I cracked was a semi-fail! Oh yeah, it looks good in the picture, but you don't see my baking sheet with egg white dripping down it. I think next time I will do the eggs either in the center or cook them separately and place them on the pizza. The dough was really good too. Kind of like a crisp cracker which is exactly how I like my pizza dough. I loved the herbs in it too.


So now I need your help! I have five more balls of rosemary pizza dough. What other combinations would you like to see?


Egg, Ham and Spinach Pizza
(Slightly adapted from Ellie Krieger)

Serves 4

1 unbaked, whole wheat pizza crust (recipe below)
4 cups baby spinach leaves
Olive oil for drizzling
Kosher salt (optional)
3 slices prosciutto, roughly torn
1/2 cup freshly grated Parmesan
2 garlic cloves, thinly sliced
4 eggs (if making for four people)

Preheat oven to 450 degrees F. Place the pizza dough on the back of a baking sheet sprinkled with cornmeal. Scatter spinach all over crust. Drizzle with oil and lightly sprinkle with salt if desired (a little will go a long way since the prosciutto and Parmesan are already salty). Evenly distribute prosciutto, Parmesan and garlic on top of spinach. Crack eggs onto pizza, roughly positioning 1 yolk on each pizza quarter. Bake for 12-15 minutes, until spinach is wilted and egg whites are just fully cooked. Cut into 4 large slices.

White Whole Wheat Pizza Dough
(From 101 Cookbooks)

4 1/2 cups white whole wheat flour
1 3/4 teaspoons salt
1 teaspoon instant yeast
1/4 cup olive oil
1 3/4 cups water, ice cold
2 tablespoons rosemary, chopped (optional, but recommended!)
Semolina flour or cornmeal for dusting

Stir together the flour, salt, and instant yeast in the bowl of an electric mixer. By hand stir in the oil and the cold water until the flour is all absorbed. Add the herbs if using. Switch to the dough hook and mix on medium speed for 5 to 7 minutes, or as long as it takes to create a smooth, sticky dough. The dough should clear the sides of the bowl but stick to the bottom of the bowl (to me it looks like a tornado). Add a touch of water or flour to reach the desired effect. The finished dough will be springy, elastic, and sticky, not just tacky.

Transfer the dough to a floured counter top. Cut the dough into 6 equal pieces and mold each into a ball. Rub each ball with olive oil and slip into plastic sandwich bags. Refrigerator overnight.

When you are ready to make pizza, remove the desired number of dough balls from the refrigerator at least 1 hour before making the pizza. Keep them covered so they don't dry out.

At the same time place a baking stone on a rack in the lower third of the oven. Preheat the oven to 450 degrees. If you do not have a baking stone, you can use the back of a sheet pan, but do not preheat the pan.

Generously dust a peel or the back of a sheet pan with semolina flour or cornmeal and get ready to shape your pizza dough. Uncover or unwrap the dough balls and dust them with flour. Working one at a time, gently press a dough round into a disk wide enough that you can bring it up onto your knuckles to thin out - you should be able to pull each round out to 12-inches or so. If the dough is being fussy and keeps springing back, let it rest for another 15-20 minutes. Place the pulled-out dough on the prepared sheet pan, and jerk the pan to make sure the dough will move around on the cornmeal ball-bearings (you don't want it to stick to the pan).

Top with a few toppings of your choice.

Stumble Upon Toolbar

Thursday, February 19, 2009

Trout with Green Beans and Almonds

I have a very long list of restaurants that I want to experience at some point in my life. Unfortunately at this point in my life with the economy in the crapper and my budget being almost negative, I have to put a lot of these restaurant wishes on the back burner. Luckily there are cookbooks, magazines, and websites that will help me create restaurant dishes at home for far cheaper than it costs to visit the restaurant itself. I recently noticed that the price of trout was pretty reasonable at the farmers market so I set out to find some recipes. This one stuck out because of the small number of ingredients and the reasonable price (I replaced haricot verts with green beans). I realized that this would be my first time ever dealing with an entire fish. Of course, I have cooked with shrimp a bajillion times and even dealt with calamari recently, but the only other fish I cook with is fish that is already prepped and filleted. Growing up, my mom always used to make us go with her on once a month trips to the fish market and then would spend the rest of the afternoon stinking up the house and cleaning the fish. Of course, I was always happy to eat the fish once it was prepared, but I now wish I had payed a bit more attention to the preparation. To say I was intimidated would be an exaggeration. I kind of had to psych myself up for it and even then, the little guy looking up at me kind of creeped me out.


He knows I've got the jitters about this.


Well it turns out the fish monger at the farmers market had already done some of the work for me, so I tried to follow the directions in the recipe as best I could. Luckily, I am not a contestant on Top Chef and not risking elimination. I don't think I dressed the trout entirely correctly, but at least I'm not being sent home for doing a bad job. Anyway, once I got over my unease of prepping the fish, the rest of the recipe is quick and quite simple. It's also incredibly tasty. The browned butter with toasted almonds was rich, but the lemon cut through the richness slightly. It went very well with the crisp green beans and flaky fish. I greatly reduced the amount of butter called for in the dish because not only did I want to lighten it up, but I was also only cooking just one fish. Although I won't be any awards or moving on to the next round for my work on the fish, I am glad that I was able to reasonably recreate this dish in the comfort of my own home. Below is the recipe with the measurements I used for one fish, but if you want to make this for more than just one or two servings, please click the link.

Oh hell, I just looked at the picture on the website and I definitely prepared the fish incorrectly. Luckily, the dish still worked out!

Trout with Green Beans and Almonds
(Adapted from Thomas Keller)

1 boned, whole trout
4 ounces (approx) green beans, stem ends removed
Kosher salt and freshly ground pepper
Canola oil spray
3 tablespoons unsalted butter
1/4 cp sliced almonds
1 teaspoon Italian parsley, minced
1 teaspoon fresh lemon juice

To pan dress the trout (which I completely did wrong!):
With scissors, cut away the dorsal fin along the back of each fish. Hold each pectoral fin (the one closest to the head) and cut away and discard the gill plate and pectoral fin. Turn the fish on its back and open it up. Starting at the head, cut away the belly flap on each side, along with the pelvic fin. Remove the tail by cutting across the fish about an inch from the bottom of the tail. Set aside.

For the green beans:
Bring a large pot of generously salted water to a boil. Prepare an ice bath. Blanch the beans in the boiling water for 2 to 6 minutes, or until they are barely tender, with a slight bite still left to them. Drain the beans and transfer to the ice bath to chill quickly, then drain again and dry on paper towels.

To complete:
Lightly sprinkle both sides of each trout with salt and pepper. Heat a 12-inch nonstick pan (special oval pans work best for fish) over medium-high heat. Coat each pan with a light film of canola oil spray. Add the trout skin side down and sauté for about 4 minutes on one side only. The fish may still look undercooked at the top of the flesh, but the hot ingredients that will top them will complete the cooking.

Meanwhile, put the beans in a sauté pan, add 1 tablespoon of the butter and 2 tablespoons water, and place over medium heat. Heat, stirring occasionally, until the water has evaporated and the beans are hot and glazed with butter. Season to taste with salt and pepper. Remove the pan from the heat and keep warm.

When the fish are done, cut off the heads and discard, if desired, and place the fish on serving plates. Drain the oil from one of the pans and return the pan to the heat. Add the remaining 2 tablespoons butter and a pinch of salt to the hot pan. When the butter begins to brown, add the almonds, shaking the pan to brown them evenly. When they are a rich golden brown, add the parsley and lemon juice.

Meanwhile, cover the trout with the beans.

Spoon the foaming butter and almonds over the green beans and around the edges of the plates.

Stumble Upon Toolbar

Wednesday, February 18, 2009

Warm Quinoa, Spinach, and Chicken Salad

Have I told you guys about this cool new tool I have been using to plan my weekly meals? It is really helping me stay organized and keep my shopping lists in one place instead of having a billion Post It's all over the place. It's still in the beta phase, but I think it will just keep getting better. Since I post so often, one of the things I look for in a recipe is portability of leftovers. I rarely go out for lunch during the work week. While scanning my various sites and books, I found this recipe. The original recipe calls for shiitake mushrooms instead of chicken, but most fungus still makes me wary so I just went with chicken this time. Shiitakes actually don't scare me as much as other mushrooms so I may try it again with them. This is an easy and quick recipe with great flavors. I used a full quarter cup of olive oil which I may reduce next time, but otherwise it was fantastic. The dressing was nice and tangy and went perfectly with the creamy feta. The chicken was great in this too. I have only ever had quinoa in vegetarian recipes so the chicken added a nice heartiness and I think quinoa and chicken are a natural pairing.


Warm Quinoa, Spinach and Chicken Salad
(Adapted from Everyday Food: Great Food Fast)

Makes 2 servings

1/4 cup red wine vinegar
3-4 tablespoons olive oil
Coarse salt and fresh ground black pepper
1 chicken breast, sliced
1/2 cup quinoa, rinsed
1/2 pound baby spinach
1/2 cup crumbled feta cheese

In a small bowl whisk together the vinegar and oil and season with salt and pepper to taste.

In another bowl, pour half of the dressing over the chicken and let it marinate for about 20 minutes.

In a small saucepan combine the quinoa with one cup of water and a large pinch of salt. Bring to a boil, reduce the heat to medium. Cover and let simmer until the liquid has been absorbed, about 12 minutes.

Meanwhile, cook the chicken in a skillet over medium heat until cooked through.

Place the spinach in a large bowl, add the hot chicken, quinoa, and reserved dressing. Toss to combine (the spinach will wilt slightly). Top with the crumbled feta and serve immediately.

Stumble Upon Toolbar

Tuesday, February 17, 2009

Rice Noodle Soup with Shrimp

When you're not feeling so great and you have a rainy day off from work, all you want is soup, right? I had been thinking about this soup for a while, but I finally got around to making it yesterday. In between bites of my mock Pinkberry, I was slurping on this soup. It's delicious and easy and can be changed up so may ways. Below I am giving amounts for how I made it, but please know anything can be added or subtracted or omitted and you will still probably end up with a delicious product. The noodles really seemed to soak up the broth so leftovers were more just noodles than soup, but it was still delicious. It is a really fast recipe and so comforting when you are in the mood for something warming.


Rice Noodle Soup with Shrimp
(By Esi)

Makes 2 servings

3-4 cups vegetable stock (you can also use chicken stock or whatever stock you have on hand,, or a combination of stock and water)
1/2 package rice noodles
2 cloves garlic, grated
1/2 teaspoon fresh ginger, grated
Splash low-sodium soy sauce
8-10 shrimp
2 green onions, sliced
1 head bok choy, roughly chopped
Sesame oil for drizzling
Salt (as needed)

Bring the stock, ginger, garlic, and soy sauce to a boil. Add the noodles and cook for about 6 minutes. Reduce to a simmer. Add the shrimp and cook until the shrimp turn pink. Stir in the bok choy and cook for another minute or two. Check soup for seasoning. Add salt as needed.

Divide the soup among bowls. Top with scallions and a drizzle of the sesame oil.

Stumble Upon Toolbar

Monday, February 16, 2009

Yogurt Sorbet

Are you all having a lovely long weekend? Any Valentine's surprises? Well, as I mentioned on Saturday, I didn't have a Valentine so instead I went out and got MYSELF a little present (I also bought myself a lovely bouquet of flowers). I have been wanting an ice cream machine for a while so Tony and I went to The Grove at the butt crack of dawn (well, early for a Saturday) so I could get one. If you have known me for a while, you know that I am totally in love with Pinkberry. I used to get a manicure every week and the WeHo Pinkberry store was conveniently placed across the street from the salon. Let me tell you, a manicure and Pinkberry is an excellent way to start your weekend. Now that my budget has shrunk, I have to do my own manicures and weekly Pinkberry trips are out of the question. I was so excited when I found this recipe because it meant I could have the swirly goodness on my own and without any of the questionable ingredients that Pinkberry actually admitted to using. Anyway, one of the best things about this recipe are that it only has three ingredients. I topped mine with a few pom seeds that I have been saving for a rainy day (in my freezer). Pom seeds and this type of frozen yogurt are a match made in heaven I tell you. This was sooo good and the amount it makes is a way better deal than popping into a Pinkberry store to get a large container of the stuff. As you can tell from the picture, it melts quickly, but if you are not photographing this like I did, it probably won't last that long anyway. By the way, I must have been blind when I was reading the recipe. I just realized it calls for 3 cups of yogurt and I only used 1. Oh well, it was still amazing.


Yogurt Sorbet
( Adapted from Patricia Wells)

3 large egg whites
2/3 cup sugar
1 cup plain nonfat yogurt

With a hand-held mixer, beat the egg whites in a medium bowl, until frothy. While still beating, slowly add the sugar and beat on high speed until the egg whites are stiff and shiny, about 4 minutes. (This can also be done in the bowl of an electric mixer fitted with the whisk attachment)

In another bowl, whisk the yogurt until smooth. Fold in the egg whites. Transfer the mixture to an ice cream maker and freeze according to the manufacturer's instructions. Freeze in a quart container until ready to serve.

Stumble Upon Toolbar

Saturday, February 14, 2009

Croque Madame

The signs were everywhere. Diana made a Croque Monsieur earlier in the week, then a couple of days later, I spotted Kevin's Croque Hawaii. It was just a matter of time before I would be making my own Croque Mr(s). I have been wanting to try the French's take on a grilled cheese for quite sometime, but lately I just haven't been in the mood for heavy foods. It could have had something to do with our insanely warm temperatures that started the year. When it is hot, the only food I want is fruit and vegetables and things that won't way me down. However, the last couple of weeks have proved that we do know how to have some form of winter here in Southern California, even though the rest of the country would probably scoff at what we think of as "cold weather". However, for me it means I am finally wanting hearty and warming foods like this sandwich and soup. If I had a Valentine, this is what I would be making him for today. It's a simple preparation that yields extra special results. It's decadent and so wonderfully satisfying, you may be too full to do anything else, but it's so worth it!

In the immortal words from Rachel Dratch in 30 Rock, season one...HAPPY VALENTIMES!


Croque-Madame
(Slightly adapted from Epicurious)

Makes 2 sandwiches

2 1/2 tablespoons unsalted butter, plus extra for grilling sandwiches
1 tablespoon plus 1 1/2 teaspoons all-purpose flour
1 cup whole milk
1/8 teaspoon salt
Dash freshly ground black pepper
Dash grated nutmeg
1/2 cup, plus 3 tablespoons shredded Gruyere, divided
4 slices sandwich bread
2 teaspoons Dijon mustard
1/4 pound thinly sliced Black Forest hame
2 eggs

Make sauce:
Melt 1 1/2 tablespoons butter in a small heavy saucepan over moderately low heat, then whisk in flour and cook roux, whisking, about 3 minutes. Whisk in milk and bring to a boil, whisking constantly. Reduce heat and simmer, whisking occasionally, about 5 minutes. Whisk in salt, pepper, nutmeg, and 2 tablespoons cheese until cheese is melted. Remove from heat and cover surface directly with a sheet of wax paper.

Make sandwiches:
Preheat the broiler.

Spread 1 1/2 tablespoons sauce evenly over each of 2 slices of bread, then sprinkle evenly with remaining cheese (1/4 cup per slice). Spread mustard evenly on remaining 2 bread slices and top with ham, dividing it evenly, then invert onto cheese-topped bread to form sandwiches.

Lightly oil a shallow baking pan.

Melt 1 tablespoon butter in a 12-inch nonstick skillet over moderately low heat, then cook sandwiches, turning over once, until golden, 3 to 4 minutes total. Remove from heat and transfer sandwiches to baking pan, then wipe out skillet with paper towels.

Top each sandwich with 2 tablespoons sauce, spreading evenly. Broil sandwiches 4 to 5 inches from heat until sauce is bubbling and golden in spots, 2 to 3 minutes. Turn off broiler and transfer pan to lower third of oven to keep sandwiches warm.

Heat a bit more butter in nonstick skillet over moderate heat until foam subsides, then crack eggs into skillet and season with salt and pepper. Fry eggs, covered, until whites are just set and yolks are still runny, about 3 minutes. Top each sandwich with a fried egg and serve immediately.

Stumble Upon Toolbar

Friday, February 13, 2009

Herbed Lentils

I spotted this recipe on The Kitchn recently and it sounded easy, and relatively light so I thought I would give it a try. I am constantly looking for things like this to bring to work and I have really come to embrace lentils in the last year. It's a pretty straightforward recipe and then I went to taste it and realized it was almost exactly like a recipe I made months ago which was a warm lentil salad with sausage. I enjoyed these herbed lentils, but I think the sage overpowered the dish a bit. I think I have mentioned before that I am not the biggest fan of raw sage and because the sage's contact time with the heat is so brief, you really can taste a lot of it. The rosemary is a pretty strong flavor so if I were to make this again, I would probably intensify the flavors of Dijon and balsamic in the dressing because they got a little lost here.

Hooray, we are almost at another weekend, and it's a long one! Do you guys have plans for Valentine's Day?


Herbed Lentils
(Adapted from The Kitchn)

1 cup lentils
1/2 teaspoon salt
Freshly ground black pepper
2 slices bacon, chopped
1 shallot, minced
2 cloves garlic, minced
2 sprigs rosemary
5-6 sage leaves
2 sprigs thyme
Small handful parsley

For the dressing:
1 tablespoon Dijon mustard
2 tablespoons olive oil
1 tablespoon balsamic vinegar
Kosher salt and freshly ground pepper to taste

Wash and rinse the lentils. Put in a small saucepan and cover with water. Cover and simmer over low heat until just cooked and tender - about 20 minutes. Remove from the heat and fluff with a fork. Add salt and pepper to taste.

Cook the bacon in a heavy pan over medium heat until done. Remove and drain on paper towels. Drain most of the fat out of the pan, but leave a little and slowly cook the garlic and shallots until soft and golden. Finely chop all the herbs and cook them slowly with the garlic at the end.

Toss the bacon and herb and garlic mixture with the lentils. Whisk the dressing ingredients together and toss with the lentils too, tasting and adjusting as you go.

Stumble Upon Toolbar

Thursday, February 12, 2009

Pasta with Olive Tapenade

Here's another quick recipe if you don't have a lot of time on the weeknights. I saw it recently on Serious Eats. I have had a jar of kalamata olives in my refrigerator for longer than I care to admit. This dish basically takes as long as it takes to bring the water to a boil and cook the pasta. I decided to add a little more Mediterranean flair to it with some of the unbelievable feta I picked up at the farmers market. I wish you could all have some of this feta. It is so creamy. I have never had anything like it. The tapenade is really good. I wish I had made a little more of it to go on the pasta. It's kind of hard to tell, but it really did a go throughout the whole dish, but I wanted more for spreading on bread or crackers. You really want to go light on the salt in this dish and perhaps only use salt in the water for the pasta. Also, since I used the red pepper flakes (just a small pinch, I am still recovering from the chipotle shrimp), I left out the ground black pepper. I love my mini food processor for small jobs like this...well, really any jobs that require a food processor since I don't have a full sized one, but anyway, I think I am going to be making some more tapenade this weekend...


Pasta with Olive Tapenade
(Adapted from Real Fast Food: 350 Recipes Ready-to-Eat in 30 Minutes as found on Serious Eats)

2 tablespoons pitted kalamata olives
1/2 teaspoon capers
1/4 teaspoon dried oregano
Olive oil as needed
Red pepper flakes (optional)
2 tablespoons chopped parsley
1/2 pound long pasta, like spaghetti
Small pat of butter
Salt
Ground pepper (optional)
Crumbled feta (optional)

Bring a pot of salted water to boil, and cook the pasta until al dente.

In the meantime, combine the olives, capes, oregano, and a little olive oil in a mini food processor or mortar and pestle. Blend or smash until well-combined into a paste. Add more olive oil if needed, aiming for a loose paste. (If you'd like to add a little chili, cook chili flakes over low heat in the olive oil, then add to the rest of the ingredients).

Drain the pasta, reserving some cooking water, and toss in a serving bowl with the olive paste and chopped parsley. Add the butter and toss until melted. If the pasta is dry, use a little pasta water or more olive oil to loosen it. Top with crumbled feta if desired and serve immediately.

Stumble Upon Toolbar

Wednesday, February 11, 2009

Chipotle-Lime Glazed Shrimp

I recently added this recipe to my lighter recipes file (in my mind) and I knew it was only a matter of time before I tried it. With all the citrus at the farmers market, it was easy to get some limes and I had everything else on hand (the best kind of recipes are made with things I have on hand). Last night when I got home, I was absolutely starving and this came together in no time. I had it prepped, cooked, and photographed in a half hour. Of course it was a super quick photo "shoot" since I was so hungry. As usual, I upped the amount of spice and used two whole chipotles as well as 2 teaspoons of the adobo sauce. If you don't have as high tolerance for spice as I seem to have, feel free to reduce the amount. My shrimp were pretty wet so my sauce came out kind of thin. I ended up transferring the shrimp to my dish and then reducing the sauce a bit and then pouring it over the shrimp. This is really similar to a recipe I made pre-food blogging that I found on Kevin's site. It's perfect for when you want something really delicious and don't have a lot of time.

Chipotle-Lime Glazed Shrimp
(Adapted from Ezra Pound Cake)

2 teaspoons vegetable oil
1/2 pound large shrimp
1/8 teaspoon salt
1/8 teaspoon freshly ground black pepper
Small pinch of sugar
2 chipotles in adobo, minced (feel free to reduce this amount if you want it way less spicy)
2 teaspoons adobo sauce
1 tablespoon lime juice
2 teaspoons brown sugar
1 tablespoon cilantro, chopped

To make the glaze: Stir together chipotle chile, adobo sauce, brown sugar, lime juice, and cilantro in small bowl.

Heat the oil in a large skillet over high heat until smoking, Meanwhile, toss shrimp, salt, pepper, and sugar in medium bowl. Add the shrimp to the pan in single layer and cook until spotty brown and edges turn pink, about 1 minute. Remove pan from heat; using tongs, flip each shrimp and let stand until all but very center is opaque, about 30 seconds. Transfer shrimp to large plate. Add chipotle mixture, and toss to combine. Cover skillet and let stand until shrimp are cooked through, 1 to 2 minutes. Serve immediately.

Stumble Upon Toolbar

Tuesday, February 10, 2009

Wildflower Honey Shortbread Bars

When I was growing up and when I came home to visit from college, my parents would sometimes have tea time. It was usually a last minute decision, but my mom would always find ways of making it special. One of the things I loved most was taking big chunks of shortbread and dunking it in my tea which was usually unsweetened and always without milk because that's how I prefer my tea. I have never made shortbread on my own, but it's been something I have been wanting to try. Last week I saw this recipe on the LA Times site and I knew I would be making it soon. I always have wildflower honey on hand, but this recipe called for creamy wildflower honey so I waited until the Sunday farmers market to pick some up. I am totally obsessed with Honey Pacifica and I love tasting the different varieties every so often. Raul swears by the sage honey. As Dawn would say, this recipe is shortbread kicked up a couple of notches. The base is a basic shortbread, and then you add a layer of creamy honey and another layer of shortbread crumbs and then top the whole thing off with cinnamon and sugar. I mean, really?! It is so, incredibly good. If you are lucky enough to have someone to celebrate Valentine's Day with (unlike me), don't buy them flowers...make them this shortbread. They will love you. You will love you. It's really that good. Instead of a square pan, I baked this halved recipe in my mini springform pans, but I still had enough for two pans. Honestly though, you can never have too much shortbread. Go make some now! What are you waiting for?

Sometimes I think the number of pictures I post is in direct correlation to how good a recipe is. Get the picture?


Hey, no one else is buying me flowers for Valentine's Day...had to get them for myself.


Did you see my review of the Adele/James Morrison show?

Wildflower Honey Shortbread
(Adapted from the LA Times)

3/4 cup (1 1/2 sticks) unsalted butter at room temperature
1/2 cup, plus 1 tablespoon powdered sugar, divided
1/4 teaspoon salt
1 1/2 cups flour
2 tablespoons - 1/4 cup creamy wildflower honey
1/4 teaspoon cinnamon

In the bowl of a stand mixer using a paddle attachement, or in a medium bowl using a hand mixer, mix together the butter, 1/2 cup of the sugar, and the salt until combined, 1 to 2 minutes, being careful not to overmix. With the mixer running, gradually add the flour and mix just until the dough comes together.

Divide the dough into quarters. Shape one quarter into a small log, 1 to 2 inches in diameter and cover with plastic wrap. Combine the remaining quarters and shape into a disc. Wrap the disc in plastic wrap and refrigerate both portions for 1 hour until firm.

Heat the oven to 350 degrees. Unwrap the disc of dough and press it into a 4 1/2 inch springform pan (if using the full recipe, press it into a 9-inch square baking pan), working until the dough evenly covers the bottom of the pan. Prick the dough all over with a fork and set aside.

Unwrap the small log of dough and roll it into a rough rectangle. It doesn't have to be perfect as it will be crumbled as topping later. Place the dough on an unbuttered baking pan.

Place the cake pan on the top rack of the oven and place the baking pan on the center rack. Bake the baking pan shortbread until lightly browned along the edges, about 15 to 20 minutes, and the cake pan shortbread until golden brown about 30-35 minutes. Transfer each pan when done to a cooling rack to cool completely. Run a knife along the edges of the cake pan to loosen the shortbread as it cools.

When the shortbread is cooled, spread the honey evenly over the cake pan shortbread. Crumble the smaller shortbread and sprinkle most of the crumbs over the honey (save the rest for sprinkling over ice cream - a really good suggestion from the LA Times). Lightly press the topping into the shortbread. cut the shortbread into squares or large pieces. Combine 1 tablespoon powdered sugar with the cinnamon and sift over the shortbread before serving.

Stumble Upon Toolbar

Monday, February 9, 2009

Check Me Out!

I did my first ever music review for Tony's blog Musicbleep!! It took me like a week to write it because I have never had to review a show before, but it was so much fun. You can read the review here and after you finish, poke around Tony's blog to learn about the latest in music. He's got all the inside info!!

Stumble Upon Toolbar

White Cheddar Puffs with Scallions

These little puffs are what I served with the orzo soup from yesterday. Back when we had our holiday gift exchange, I ended up (won?) with a copy of the new Bon Appetit cookbook. Little did I know at the time, but the book was bought by Raulito who I now think purchased this book with me in mind...right, Raul? The book is massive with lots of great sounding recipes, but the one downfall is that the pictures are few and far between. As I think I have mentioned before, I benefit more from books where there are pictures on every page. No matter, this is one of the first recipes that called to me. I had plenty of white cheddar left from the mini burgers and I always have scallions on hand. I have only done a cooked dough like this one other time when I made zeppole (pre-food blogging), but it's pretty easy. I used my stand mixer, but it would be done just as easily with a hand mixer or with a whisk. Another good thing is that the dough can be done ahead of time and be refrigerated or frozen until you are ready to bake them. This is a deliciously simple recipe. The puffs are best when warm with a little bite from the onion and a lovely melted cheesy interior. I had an embarrassing number of these before the soup was even done. I will definitely make these again and I am thinking of some kind of sun dried tomato hummus or spread to go between them...


Did you watch the Grammys? Congratulations are in order to the "Best New Artist" and "Best Pop Vocals". The show was laughably horrible as I Twittered about, but her performance (minus Sugarland) and her awards were pretty much the highlight.

White Cheddar Puffs with Green Onions
(Adapted from The Bon Appetit Cookbook: Fast Easy Fresh)

Makes about 18 puffs

1/2 cup water
2 tablespoons butter, cut into 4 pieces
1/4 teaspoon coarse kosher salt, plus extra for sprinkling
1/2 cup plus 1 tablespoon all-purpose flour
2 large eggs
3/4 cup (packed) extra-sharp white cheddar
1/3 cup green onions, minced

Line 2 baking sheets with parchment paper. Bring the water, butter, and 1/4 teaspoon salt to a boil in a heavy saucepan. Remove from heat; mix in flour. Stir over medium heat until the mixture becomes slightly shiny and pulls away from the sides of the pan, about 3 minutes. Transfer to a stand mixer fitted with the paddle attachment. Add the eggs one at a time, mixing well after each addition to form a sticky dough. Mix in the cheese and green onions.

Using two teaspoons, form the dough into 1-1 1/4 inch ovals. Drop onto baking sheet 1 inch apart.

Preheat the oven to 375 degrees. Bake cheese puffs until golden, about 30 minutes if using room temperature dough and 35 minutes if the dough is chilled or frozen. Serve immediately.

Stumble Upon Toolbar

Sunday, February 8, 2009

Orzo Soup

Just as I said I would on Friday, I stayed in all day yesterday. Unfortunately (?) for me, it wasn't rainy all day as the meteorologist promised. Oh well, I had a great day cooking and playing far too much Wii tennis. My arm is quite sore today! This is one of those recipes I saved a while ago, but was reminded of when I saw it last week on Diana's site. It's exactly the kind of food you crave when the skies get dark and the rain is coming down and it's enough to make you forget that a nice baked mac and cheese with bacon is on your mind. I couldn't track down the whole wheat orzo in time to make this recipe. I am told it's sold at Whole Foods, but that store isn't exactly convenient to me right now. I used regular orzo. I used homemade vegetable stock which I make every so often with scraps left over from the farmers market. One of the reasons why I love making vegetable stock myself is because it requires far less time than chicken stock. I just wait for the water to boil and then I can go off and do a Pilates workout or play Wii for an hour...or whatever. Since I had read Diana's review of this recipe, I decided to make some bread type food to go with the soup just in case it wasn't filling enough. More on that tomorrow, but let's just say, I have had my fill of cheese puffs for at least the next week. Normally on Saturdays I am left to eat scraps of leftovers from the weekday before I go to the farmers market on Sunday, but this was such an easy fresh recipe to make on the weekend and one that didn't make me feel guilty afterwards.


Orzo Soup
(Lightly adapted from 101 Cookbooks)

3 1/2 cups vegetable broth
3/4 cup orzo
1 cup spinach, chopped
1-2 large spoonfuls canned fire-roasted diced tomatoes, drained
Large pinch red pepper flakes
Extra-virgin olive oil
1 egg white
Salt (I used Kosher salt)
Grated Parmesan (for topping)

Bring the broth to a boil in a large saucepan. Add the orzo and cook until tender, about 8-10 minutes. Stir in the spinach.

In the meantime, heat the tomatoes, red pepper flakes, and a splash of olive oil in a separate saucepan. Taste and season with a bit of salt if needed.

Just before serving, slowly pour the egg whites into the soup, stirring quickly with a whisk. The white should take on a raggy appearance. Taste and add more salt if needed. Serve the soup in individual bowls, with each serving topped with a spoonful of tomatoes, a drizzle of olive oil, and a dusting of cheese.

Stumble Upon Toolbar

Friday, February 6, 2009

Spicy Black-Bean Cakes

So here's my last Martha Stewart recipe of the week. Since I had those carrot and parsnip fritters last week, I have been thinking about what other vegetables could be made into a patty form. I guess the possibilities are pretty much endless, but this one appealed since I had most of the ingredients on hand. Since I cook for one and prefer to cook in season, I freeze a lot of things so that I can have them when they aren't readily available at the farmers market. Several months ago, I bought a huge basket of jalapenos and have them in my freezer for whenever I need them. Hopefully by the time we get to this spring and summer, I will clear a lot of things from my freezer so I can make room for next year's goodies. These bean cakes are really easy to prepare and healthy, especially since they are broiled versus fried. I think I still have to learn some tricks with my broiler. I almost had a situation similar to my herbed-baked eggs. Luckily, I was able to save these before they totally burned, but they weren't as crispy as they could have been. I loved that the heat in these is subtle and kind of creeps up on you. They are slightly sweet from the sweet potato and the lime sour cream added some nice coolness AND heat with the jalapenos in it.


The weekend is almost upon us, do you have any plans? Winter has finally descended on La La land (at least for this weekend), I am staying in and making soup!


Spicy Black-Bean Cakes with Lime Sour Cream
(Adapted from Everyday Food: Great Food Fast)

For the cakes:
1 1/2 teaspoons olive oil, plus extra for brushing
2 scallions, thinly sliced
3-4 garlic cloves, minced
1 jalapeno, finely chopped (ribs and seeds removed, if desired)
1 1/2 teaspoons ground cumin
1 can (15 ounces) black beans, drained and rinsed
Kosher salt and freshly ground black pepper
1 cup sweet potato, coarsely grated (about 1/2 a sweet potato)
1 egg, lightly beaten
1/4 cup plain breadcrumbs

Lime Sour Cream
1/4 cup reduced-fat sour cream
1 teaspoon lime juice
1 jalapeno, mined (ribs and seeds removed, if desired)
Kosher salt

To make the cakes:
Heat the broiler. In a small skillet over medium heat, warm 1 1/2 teaspoons olive oil. Cook the scallions until softened, about 1 minute. Add the garlic, jalapeno, and cumin; cook until fragrant, about 30 more seconds. Transfer the onion mixture to a large bowl.

Add the beans to the bowl; mash with a fork or potato masher, leaving about a quarter of the beans whole. Season generously with salt and pepper. Fold in the sweet potato, egg, and breadcrumbs. Divide into 4 balls of equal size; flatten into patties.

Brush a baking sheet with a small amount of olive oil; place the patties on the sheet, 1/2 inch apart. Broil 4 inches from the heat until golden brown, 8-10 minutes. With a thin, metal spatula, carefully turn the cakes. Broil until crisp, 2-3 minutes more. Serve with the lime sour cream.

To make the sour cream:
In a small bowl combine the sour cream with the lime juice, and jalapeno; season with salt.

Stumble Upon Toolbar

Thursday, February 5, 2009

Paprika Cheddar Drop Biscuits

Apparently it's Martha Stewart week here on Dishing Up Delights. I didn't do it intentionally, I just had several recipes saved and they all happened to be from Martha. Here's another one. I found this courtesy of Joy the Baker. Did you see them? I made them because I wasn't in the mood to bake bread this weekend. I am so glad I did. They are phenomenal. They only take a few minutes to put together (even with the shredding of cheese). I completely forgot to sprinkle paprika on top. It didn't matter, they were still really good. I ate three within a few hours of each other. They are really, really good with scrambled eggs which is the way I have been enjoying them this week. They are also really good with a drizzle of honey.


Paprika Cheddar Drop Biscuits
(From Martha Stewart's Baking Handbook)

Makes 8 giant biscuits or 12 smaller biscuits

2 1/4 cups all-purpose flour
1 1/4 teaspoon baking powder
3/4 teaspoon baking soda
1 teaspoon salt
2 teaspoons sugar
3/4 teaspoon paprika, plus more for dusting
6 Tablespoons unsalted butter, cold, cut into pieces
1 heaping cup finely grated cheddar cheese
1 1/2 cups heavy cream

Preheat the oven to 375 degrees. Line a baking sheet with parchment paper and set aside.

In a large bowl, whisk together the flour, baking powder, baking soda, salt, sugar and paprika. Using a pastry blender, or your fingers, cut the butter into the flour mixture until it resembles course meal with a few larger clumps remaining. Stir in the cheese with a fork.

Add the cream; using a rubber spatula, stir until the dough just comes together. The dough will be slightly sticky; don’t over mix. Using a 1/2-cup measure (for giant biscuits) or a 1/4-cup or 1/3-cup for smaller biscuits, scoop mounds of dough about 1 1/2-inches apart of the prepared baking sheet. Lightly dust with paprika.

Bake, rotating the sheet halfway through baking, until golden brown, about 15 to 20 minutes. Slide parchment and biscuits onto a wire rack to cool or let biscuits cool on pan for 5 minutes before removing onto a wire rack with a spatula. Serve warm or at room temperature.

Stumble Upon Toolbar

Wednesday, February 4, 2009

Honey Pancakes with Greek Yogurt and Pistachios

Lucky Heather got a snow day last week and used her time off to make these amazing sounding Honey Pistachio Pancakes. I haven't had a snow day since I was 11, but I wanted to make the pancakes too. I originally wanted to make these over the weekend, but found myself having them for dinner the other night instead. I had to change a couple of things. I used part whole wheat flour and since I didn't have any pistachio extract around, I used vanilla. I have a rather large container of honey and went a little heavy handed with it so the honey taste was very pronounced in both the pancakes and yogurt topping, but since I love honey, I didn't mind. I loved the sweet pancakes with the sweet and tart yogurt topping. I definitely need to practice my pancake flipping skills. Mine came out a little thin, but they were fun to make and even better to eat!

Honey Pancakes with Greek Yogurt and Pistachios
(Adapted from Diary of a Fanatic Foodie)

Pancakes:
1/4 cup plus 1 tablespoon all-purpose flour
1/4 cup whole wheat flour
1 egg, lightly beaten
1 1/2 teaspoons cornstarch
1 tablespoon butter, melted
1 1/2 teaspoons sugar
1 tablespoon honey
Splash of vanilla extract
1/2 cup milk

Topping:
4-5 tablespoons nonfat Greek yogurt
1 tablespoon honey
1 tablespoon raw unsalted pistachios, roughly chopped

To make the pancakes:
In a large bowl, mix together all of the ingredients until well combined.

Cook the pancakes over medium heat. Flip when the sides become firm, and the pancake has an even distribution of air bubbles throughout the batter.

To make he topping:
Whisk together the yogurt and honey.

Top pancakes with the yogurt mixture and sprinkle with pistachios.

Stumble Upon Toolbar

Tuesday, February 3, 2009

Beef Bulgogi

I get so many recipes from other blogs and websites that once in a while, I like to go through my books to find something I have missed. This is one of those recipes that I think I saw a while ago and just tucked it away for another time. Raulito and I went to the farmers market all excited to get some grass fed beef and guess what? The meat man wasn't there!!! It was kind of annoying but since I had already worked this dish into my week's meals so I decided to get some beef at TJ's. Ok, let's talk about the bulgogi. It's really, freakin' delicious. The recipe calls for the meat to be served in lettuce cups, but lettuce cups aren't exactly practical for my work lunches. Thank goodness I had some rice (which is actually another suggestion in the book). The rice was a nice bed for the meat and sauces and it was a lovely combo of spicy, salty, and sweet. I am not a fan of bell peppers so I left them off. I garnished with some chopped cilantro. If you like bell peppers, go ahead and throw them in!


Beef Bulgogi
(Adapted from Everyday Food: Great Food Fast)

3/4 pound rib-eye steak, trimmed of excess fat
2 tablespoons reduced-sodium soy sauce
1 1/2 teaspoons toasted sesame oil
Dash of red pepper flakes
1 tablespoon dark brown sugar
4 garlic cloves, minced
1 1/2 teaspoons finely grated fresh ginger
1 red onion, halved and cut into 1-inch wedges
2 teaspoons vegetable oil
Cooked rice for serving

Freeze the beef for 20 minutes; transfer to a clean work surface. Slice diagonally (across the grain) into 1/8-inch thick strips. In a small bowl, whisk together the soy sauce, sesame oil, red pepper flakes, brown sugar, garlic, and ginger. Place the onions in a small bowl; toss with half the soy marinade. Toss the steak in the remaining marinade; let stand for 15 minutes.

Heat 1 teaspoon of the vegetable oil in a large nonstick skillet over medium-high heat. Add the onion and cook until softened; about 5 minutes. Transfer to a plate. Wipe the skillet clean with a paper towel.

Heat the remaining teaspoon of vegetable oil over high heat. Cook half the meat, turning often until browned, about 2 minutes. Transfer to the plate with the onions. Add the remaining meat and cook until browned. Add the onions and first batch of meat and any accumulated juices to the pan. Cook, tossing until heated through, about 1 minute. Serve over cooked rice.

Stumble Upon Toolbar

Monday, February 2, 2009

Greek Turkey Burgers

Blech, Monday again. This weekend went by way too quickly as usual. Before I forget, I should let you guys know that we are heading into the busiest time of the year at work so it may take me longer than normal to respond to your comments. Know that I appreciate all of them and I promise to try and respond as fast as I can. Well, unlike many people, I didn't attend any Superbowl parties. I feel like I only watch the Superbowl for the commercials and when you go to a party, there are usually too many people who talk over the important parts (the commercials) so you can't pay attention. Instead, I stayed home, cooked, cleaned, and also enjoyed one of these burgers. I actually made them on Saturday, but had enough left over for me to enjoy for the big game. I had a little turkey left over from the turkey meatballs over greens and I found the Greek inspired recipe on Closet Cooking. Once again, I made my own buns because it's way cheaper than running to the store to buy some buns. Plus, I think they are really easy to make. Last week I got some really awesome feta from the farmers market. I was a little dubious when the vendor claimed it would be the best feta I had ever tasted, but it kind of was. I prefer a chunkier tzatziki so instead of shredding the cucumbers, I just chopped them into smaller pieces. The overall combination of the burger and toppings was fantastic! It was filling without me feeling weighed-down and the flavors were excellent.

Update, the bun recipe is here.


Greek Turkey Burgers
(Adapted from Closet Cooking)

1/2 pound ground turkey
1/2 small onion, grated
1 clove garlic, grated
1/4 teaspoon dried oregano
1 1/2 teaspoons fresh dill, chopped
2 tablespoons finely chopped fresh spinach (you can also use frozen, but make sure it is drained very well)
1 tablespoon crumbled feta
1/2 teaspoon kosher salt
1/4 teaspoon freshly ground black pepper

Mix all of the ingredients in a bowl until well combined, but do not overmix. Form the mixture into patties. Grill, broil, or pan fry the patties.

Toppings:

Tzatziki (recipe follows)
Sliced tomatoes
Baby spinach
Thinly sliced red onions

Tzatziki
(From Closet Cooking)

1/2 cup nonfat Greek yogurt
1/2 cup cucumber, peeled and finely chopped
1 tablespoon lemon juice
2 cloves garlic, grated
1 1/2 teaspoons mint, chopped
1 1/2 teaspoons dill, chopped
Kosher salt and freshly ground black pepper

In a small bowl, mix the yogurt, cucumber, lemon juice, garlic, mint, and dill. Season with salt and pepper to taste.

Stumble Upon Toolbar

Sunday, February 1, 2009

Comme Ca

If I had a way with words like Diana, I would have a really great opening line here. Alas, my mind has drawn a complete blank on how to put into words how wonderful my dinner was last Thursday night, but I am going to try. As part of DineLA Restaurant Week (which is actually two weeks), my friends and I made plans at the beginning of the month to have a special dinner out. Many restaurants were offering dinners ranging from 26-44 dollars for three courses. Most of the time, dinners at these places would cost much, much more so we couldn't pass up this deal. After looking through several menus, we all settled on Comme Ca.

At long last the 29th arrived. We had all been talking about this day for weeks. The restaurant is a French bistro with lots of small tables placed in close proximity of each other. I was a little worried that our party of six would be squeezed into a small table where we would have to shout to be heard over the noise...but then our waitress led us to the back of the restaurant. Waiting for us was a decent sized table in a corner with plenty of space for all of us, just enough of the restaurant noise to be lively without us all losing our voices so we could hold a conversation. Since we all had ample time to review the special DineLA menu, we all pretty much knew what we would be ordering, but we still spent some time looking through the regular menu, and asking our very helpful and knowledgeable waitress for suggestions.

Most of us started with the Salad Frisee Aux Lardons. Dan had the Salmon Tartare and JenFinn had the Soup Du Jour which was a roasted tomato soup with a drizzle of basil infused oil. The salad was wonderful, it had a tangy warm bacon dressing and was topped with a perfectly poached egg. I didn't try the soup, but my bite of the salmon tartare was delicious. The salmon was well seasoned and was perched on top of a crispy potato.


The main course was the stuff that hopes and dreams are made of. All of us (except JenFinn) had the Paleron of Beef Bourguignon. It perched on top of a potato puree and topped with baby carrots and a luscious wine sauce. We all whipped out our knives to cut into the beef which ended up being completely unnecessary. It was the most tender meat I have ever had and even though I am not normally a potato fan, it went perfectly well with the horseradish tinge and wine sauce. Every mouthful was like a party in my mouth. Long after I was full, I kept on eating. Ms. Finn opted for the Scottish Salmon which was served with roasted fennel, melted tomatoes, and a bearnaise sauce.


I managed to save a bit of room for dessert. Chef Meyers also owns Boule Bakery which is where the desserts come from. I opted for the Brioche Chocolate Pudding which was served with a vanilla ice cream. The deep chocolate flavor was perfect with the melting ice cream. Chris had the Profiteroles which were served with pistachio and vanilla ice cream and JenFinn had the Cookie plate which consisted of vanilla and chocolate sables.


All of the food was so delicious, I didn't want to stop eating although my stomach was so full. The experience was made better by the fact that our servers were attentive and knowledgeable. We never felt ignored or that our service was lacking in any respect. Of course the company and conversation were excellent too which made this an exceptional dining experience that lived up to the hype.

Stumble Upon Toolbar