Friday, October 30, 2009

Balsamic Roasted Brussels Sprouts and Leeks

Roasted Brussels Sprouts and Leeks

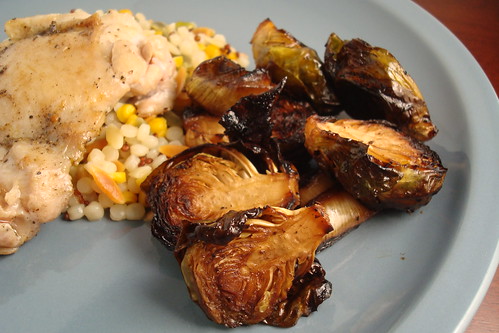
Despite what some people think, I don't have gourmet meals for dinner every night. Sometimes I am just too tired, or lazy, or get off work too late to make anything fancy. It's nights like those that I will just turn to some chicken, some harvest grains mix, and some vegetables. However last night, the vegetables were special. A few nights ago I roasted up a bunch of brussels sprouts and leeks tossed in a simple balsamic dressing. These were inspired by our fall potluck a few weeks ago. I don't even remember the last time I have had brussels sprouts before a couple of weeks ago. I always thought I didn't like them, but now I can't get enough! I am a huge fan of the nutty flavor that comes from roasting vegetables and it's a great paring with the sweet and tart balsamic and mellow onion flavor from the leeks. I'll probably be making this once a week from now until spring!

Happy Halloween weekend to all! What are you doing to celebrate?


Roasted Brussels Sprouts and Leeks

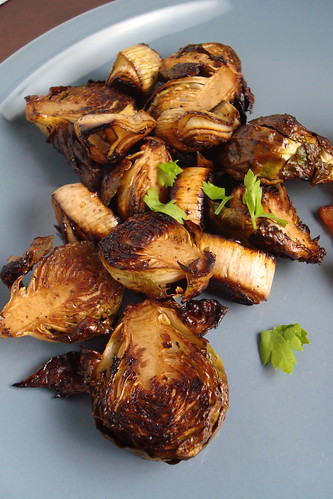
Balsamic Roasted Brussels Spouts and Leeks

1 bunch brussels sprouts, cut in half
3 leeks, washed and cut into 1/2-1 inch pieces
Extra virgin olive oil
Balsamic vinegar
No salt Greek seasoning (optional)
Kosher salt
Freshly ground black pepper

Preheat the oven to 400 degrees and line a baking sheet with foil. Drizzle the foil with a bit of olive oil.

In a small bowl toss the brussels sprouts with balsamic, Greek seasoning, more oil, and season with salt and pepper to taste. Lay the sprouts cut side up and spread the leeks in between. Spoon any remaining balsamic mixture of the the sprouts and leeks. Roast for 20 minutes. Using tongs, flip the sprouts and leeks over and roast for about 10 more minutes until the sprouts are crisp on the outside and the balsamic vinegar has caramelized. Serve warm.

Printable Recipe

Stumble Upon Toolbar

Thursday, October 29, 2009

Butternut Squash Pasties

Butternut Squash Pasties

I have been so excited to use butternut squash this season. As much of a pain as it can be to peel and cut up, it's so worth it for that sweet flesh. I came across the recipe for butternut pasties last week and was all set to make them until I saw a separate recipe for a butternut squash quesadilla. Instead of making two different recipes, I just combined them by adding the cheeses.

Butternut Squash Pasties

These little pasties were so good. I think I had three all at once. However, it was pretty late on Saturday evening when I made them so I got kind of tired of rolling out circles. With the leftover dough, I just loaded it up with the butternut mixture and baked a little galette. Cute, right? I was a little worried that the blue cheese would overpower the other ingredients, but it went beautifully with the nutty Gruyere and salty Parmesan. I think the only thing I would do next time is use only half of an onion. I love me some onion, but there was just a bit too much in here.

Butternut Squash and Three Cheese Galette

Once again, I must apologize for lack of blog visiting and commenting. I've been so busy lately. How about a piece of galette to make up for it?

Butternut Squash and Three Cheese Galette

Butternut Squash Pasties
(Adapted from The Kitchn)

1 1/3 cups all-purpose flour
2/3 cup chilled butter, cut into small pieces
6-8 tablespoons ice water
8 ounces butternut squash, peeled and cut into 1 cm cubes
1 medium red onion, diced
1 tablespoon finely chopped sage
1 tablespoon finely chopped parsley
2 tablespoons grated Parmesan cheese
2 tablespoons grated Gruyere cheese
2 tablespoons crumbled Gorgonzola cheese
Kosher salt and freshly ground pepper
1 egg, beaten

To make dough

Sift flour and a generous pinch of salt into a large bowl. Using a pastry blender or knife, cut butter into flour until the mixture resembles fine breadcrumbs. Add 1 tablespoon of ice water at a time, gently tossing between additions, until the dough just holds together. Shape dough into a ball and wrap tightly in plastic wrap. Refrigerate at least 30 minutes before rolling out.

Before rolling out the dough, let it soften slightly so that it is malleable but still cold. On a lightly floured surface, roll it out to 1/8-inch thick. Cut out two circles using a plate or bowl.

To make pasties

Preheat oven to 375 degrees.

In a large bowl, combine butternut squash, onion, garlic, sage, parsley, and cheeses. Season lightly with salt and pepper

Spoon mixture over half of each dough round, leaving a 1-inch border around the edge.

Moisten the edges of the dough with beaten egg. With cool hands, fold the pastry over and crimp the edges. Brush dough with beaten egg.

Bake until golden and cooked through, about 45 minutes. Serve hot or warm.

Printable Recipe

Stumble Upon Toolbar

Wednesday, October 28, 2009

And the Winner Is....

Thanks to all for entering my agave giveaway!! There were 36 comments and Random.org picked #9! Congratulations to Elle of Elle's New England Kitchen! Elle, please email me your address to: dishingupdelights AT gmail DOT com so we can get you your bottle of agave and cookbook. Happy cooking and thanks to all who entered. You all left me with plenty of fall ideas and I can't wait to spend some more quality time in the kitchen!

9

Stumble Upon Toolbar

Tuesday, October 27, 2009

Daring Bakers: Macarons

Pistachio Macarons with Chocolate Ganache

The 2009 October Daring Bakers’ challenge was brought to us by Ami S. She chose macarons from Claudia Fleming’s The Last Course: The Desserts of Gramercy Tavern as the challenge recipe.

Pistachio Macarons with Chocolate Ganache

I can't believe that in over two years of existence, the Daring Bakers have never taken on a macaron challenge. To me, macarons are one of those things that everyone hopes to be able to accomplish in the kitchen at least once. I made my first successful batch of macarons last winter so I was excited to have the opportunity to try them again...until I heard about how many people were failing with the recipe. The Daring Bakers forums and Twitter were full of complaints about time and money spent on a recipe that didn't seem to work. I don't know about you, but as a broke Hollywood assistant, I don't have a lot of extra time or money to repeatedly make something that may or may not work. Since this past weekend was my only shot to get the macarons done before the challenge due date, I decided to go with a recipe and tips that worked for me before.

Pistachio Macarons with Chocolate Ganache

Chocolate and pistachios are a wonderful combo. I ground my own nuts and used half almonds and half pistachios. I didn't grind my nuts as finely as I should have, so there was an interesting crunch in the shells, but it wasn't unpleasant. I used a chocolate ganache recipe from Sherry Yard that was easy and absolutely heavenly! If you make this ganache, be sure to use good chocolate because the flavor really comes through. (eek, how Ina Garten did that sound?). Katrina of she's in the kitchen is the one who gave me the heads up about the ganache recipe. Thanks Katrina! Check out the other Daring Bakers to see how their macarons turned out!

Stumble Upon Toolbar

Monday, October 26, 2009

Apple Cranberry Crisp with Oatmeal Streusel

Apple Cranberry Crisp

A few weeks ago I spotted this amazing picture on The Daily Green's food site and I could not get the thought of the recipe out of my head. I have never cooked with cranberries because they aren't exactly local to Los Angeles, but this recipe sounded too good to pass up. I got some awesome pink lady apples at the farmers market. I normally bake with Granny Smiths, but I wanted something sweeter to contrast the tartness of the cranberries. The pink ladies are sweet and tart and hold up really well while baking. I am definitely going to be using them again for some fall baking. The only change I made besides halving the recipe was to add some cinnamon to the cran-apple mixture and to the streusel topping. Of course that made my apartment smell amazing. One bonus is that this recipe calls for only a little bit of butter so it's pretty healthy. I didn't have the whole wheat flour called for so I just used all-purpose, but the whole wheat would definitely add a nice nuttiness. This is definitely a tart recipe with the cranberries, but I really enjoyed that tartness against the sweet nuttiness of the streusel. I served this with some (melted) honey vanilla ice cream...normally I hate melted ice cream, but it appears my freezer isn't actually freezing things right now and it was surprisingly pleasant with the warm crisp. I have a ton of apple cider left over so please leave suggestions for cider (that aren't doughnuts) in the comments.

PS, you still have a couple of days to enter my giveaway.

Apple Cranberry Crisp


Apple Cranberry Crisp with Oatmeal Streusel
(Adapted from The Daily Green)

Topping:
1/2 cup brown sugar, packed
1/2 cup old-fashioned oats
1/2 cup all-purpose flour*
1/4 teaspoon cinnamon
Pinch salt
4 tablespoons unsalted butter, chilled and diced

Filling:
12 ounces cranberries
1/2 cup sugar
1 1/2 tablespoons apple juice or cider
3/4 pounds firm apples (I used pink lady apples), peeled, cored, cut into cubes
1/4 teaspoon cinnamon

Combine the brown sugar, oats, flour, cinnamon, and salt in large bowl and toss to blend. Add the butter and rub in with your fingertips until the mixture resembles crumbs. Refrigerate while preparing the filling.

Preheat the oven to 375 degrees F. Grease a 8x8-inch glass baking dish.

Combine the cranberries, sugar, and apple juice in a large pot. Bring to a boil over medium heat, stirring often for about 2 minutes. Stir in the apples and cook until the cranberries are softened and their juices thicken slightly, about 4 minutes more. Transfer the mixture to the prepared dish and sprinkle on the topping.

Bake until the filling bubbles thickly and the topping is brown, about 35 to 45 minutes. Let cool at least 10 minutes before serving.

*You can substitute up to 1/4 cup whole wheat flour
Printable Recipe

Stumble Upon Toolbar

Friday, October 23, 2009

Braised Lentils with Swiss Chard and a Poached Egg

Braised Lentils with Swiss Chard and a Poached Egg


I never knew that lentils could be so sexy. I mean, look at that egg. Anyway, this dish came into my radar last week and I quickly added it to the meal plan. I always have things like garlic, eggs, shallots, and lentils lying around. I have been meaning to do a post on kitchen staples, but time has not been on my side lately. I picked up some beautiful red chard at the farmers market to complete this. I don't own a nonstick pan so I decided to poach the eggs instead of frying. I really like this method for poaching eggs, and it works pretty well for me. The earthy lentils and bite of the chard went well with that beautiful, creamy egg yolk. I was practically licking my dish when it was done. I think the only thing that could make this better is a bit of crusty bread to sop up the egg yolk and braising juices. I have a feeling I will be making this dish often this season.


Don't forget about my agave giveaway!

Braised Lentils with Swiss Chard and a Poached Egg
(Lightly adapted from Serious Eats who adapted from Last Night's Dinner)

Makes 2 servings

3 tablespoons olive oil, divided
1/2 cup French green lentils
1 bunch winter greens, such as kale, chard, collards, etc. (I used swiss chard)
1 shallot, peeled and chopped
1/2 cup red wine
2 cloves garlic, chopped
1/8 teaspoon red chili flakes, or to taste
Splash of lemon juice or sherry vinegar (optional, I forgot and it was fine)
Kosher salt and black pepper
2 eggs

In a medium saucepan, heat 1 tablespoon of the oil over medium heat. Add the shallot and saute until soft, 2-3 minutes. Add 1 cup water and the red wine and the lentils, bring to a boil, and simmer, covered, until the lentils are tender but not mushy, 25-30 minutes. Add more water as necessary. Season to taste with salt.

In the meantime, wash the greens and slice the leaves away from the stems and roughly chop the leaves. Heat 1 tablespoon of the oil, garlic, and chili flakes in a saucepan or large skillet until fragrant, then add the leaves along with 1/4 cup or so of water and a pinch of salt. Cover, turn the heat to medium-low, and allow the leaves to steam as the water evaporates, tasting for tenderness and adding more water as necessary. Finish with lemon juice or vinegar to taste if desired.

When the lentils and greens are nearing completion, poach the eggs in simmering water. Serve the greens on a bed of lentils, topped with the egg and fresh black pepper.

Printable Recipe

Stumble Upon Toolbar

Thursday, October 22, 2009

Fall Favorites...and a Giveaway!!

Well, hello pseudo So-Cal fall! As I've been (complaining) talking about lately, my hopes of a nice fall have been completely teased and then dashed lately. However, I haven't let that stop me from making some fall inspired dishes, but I have also wanted to share with new viewers of this site some of my favorites from last year. PLUS, I am having a giveaway and regular readers know how rare that is here, so stay tuned.

So as you all know, one of my favorite fall/early winter favorites is pomegranate. I have been lucky enough to be gifted with some more Pom Wonderful juice this year so look for some exciting recipes. In the meantime, let me take you back to some "old school" pom recipes.

Pom ice cream was the first ice cream I ever made and the first one without a machine. It was so worth the effort

Pomegranate Ice Cream

Pom Pizza was kind of strange sounding, but totally addictive and a classic.

Pomegranate and Prosciutto Pizza

Of course, who can forget the pumpkin recipes at this time of year. I have had quite a few...Pumpkin cinnamon rolls are so incredibly decadent and swoon worthy, I almost got a proposal!

Pumpkin Cinnamon Rolls

Pumpkin shortcakes with Apple Compote and Honey Vanilla Ice Cream are a perfect way to use up the canned pumpkin you may have laying around plus all of the apples of the season.

Pumpkin Shortcake with Apple Compote and Vanilla Honey Ice Cream

Butternut squash is one of my favorite things about the fall and winter, but I tried not to overload you with it last year (like I did with poms). One of my favorite and most simple ways to enjoy it was in a simple soup.

Butternut Squash Soup

Another fun way to enjoy butternut was in this super easy galette.

Butternut Squash Galette

I have an apple dessert coming soon, but in the meantime, how adorable is this mini apple crumb cake? Check out those huge crumbs too!!

Apple Crumb Cake

Persimmon crisps were just so cute and a unique way to enjoy this fall fruit.

Persimmon Crisps

Ok, now on to the giveaway. Remember those amazing agave sweetened brownies I made recently? Well, Xagave is giving one of my readers the chance to win a bottle of agave nectar and the same amazing cookbook I have had the chance to peruse. All you need to do to win is leave a comment on this post telling me your favorite fall recipe. If you would like an extra chance to be entered, you can tweet about it and leave another comment with a link to your tweet. By the way, you can follow me on Twitter, by clicking here. One week from today, I will pick a random number to win this awesome prize. Good luck!! If you're interested in ordering any items from Xagave for yourself, you can use the code "DISHINGUP" for free shipping!

Stumble Upon Toolbar

Wednesday, October 21, 2009

Baked Shrimp and Feta Pasta

Baked Shrimp and Feta Pasta

I am so happy the tomatoes are still plentiful this season. I discovered this dish a while ago, but I have not had all of the ingredients to make it. I tell ya, strange things are going on here in So Cal. A week ago it was raining and then a few days later it was 90 degrees. Then it cooled down briefly and now it's about to be 90 again. I just can't handle this. In fact, my body is not responding well to this roller coaster and I haven't been feeling so great the last few days. When I saw this dish, I knew I wanted to try some dill in it. Unfortunately the dill at the farmers market was not in good shape because of the rain, but fortunately I got a great deal (free!) on it. It took me a while to get this done with all the prep work, but otherwise it's a straightforward dish that really delivers on flavor. I wanted to healthy this up a bit with whole wheat orzo, but my teeny, little Bev Hills Whole Foods just does not stock the stuff (or maybe it's hidden). Regardless, despite the feta, this only requires a small bit of oil so you get great flavor for not a lot of fat and a dish that is very satisfying to eat.

Baked Shrimp and Feta Pasta


Baked Shrimp and Feta Pasta
(From Closet Cooking)

Makes 4 servings

1/2 cup orzo
2 teaspoons - 1 tablespoon extra-virgin olive oil
1 onion, chopped
2 cloves garlic, minced
1/2 teaspoon red pepper flakes
1/4 cup white wine
1 1/2 cups tomatoes, chopped
1 teaspoon oregano
salt and pepper to taste
1/4 cup fresh herbs, chopped (I used a mix of dill and parsley)
2 green onions, chopped
1/2 pound shrimp, peeled and deveined
1/2 cup crumbled feta

Preheat the oven to 425 degrees

In a medium saucepan cook the orzo for about 8 minutes until just al dente, but not soft (the pasta will cook more while baking).

In a large sauce pan, heat the oil over medium heat. Add the onion and saute until soft, about 5 minutes. Add the garlic and red pepper flakes and saute until fragrant, about 30 seconds. Add the white wine, tomato and oregano and simmer until the sauce thickens, about 5 minutes.

Remove the pan from heat and stir in the herbs and green onions. Mix the sauce, orzo and shrimp, place in a baking dish topped and top with the feta.

Bake until the shrimp is cooked and the sauce is bubbly, about 10-15 minutes.

Printable Recipe

Stumble Upon Toolbar

Tuesday, October 20, 2009

Honeyed Fig Crostatas

Honeyed Fig Crostadas

This past weekend I got together with my friends for one of our famous potlucks. As the host, JenFinn got to pick the theme which was "fabulous fall foods". As you know, I love this time of year, especially when it comes to the produce. With many pumpkin based items already planned, I wanted to do something different. The figs at the Beverly Hills market are just about gone, but I was lucky to score a couple baskets of the beautiful fruit.

Honeyed Fig Crostadas

This was definitely one of the most amazing potlucks that we've had. We stuffed our faces with pumpkin ravioli, stuffed acorn squash, brussels sprouts, pumpkin soup, pumpkin bread, salmon, pear salad, and two kinds of potatoes. Plus, later after all the wine, I had my first poutine experience (yum!). The tarts seemed to go over really well. They were pretty easy to make too. I did the dough by hand, but other than that I followed the recipe directly except I did add a splash of lemon juice to the fresh figs on top of the tarts. Fig season is just about done, so I was happy to get my hands on some and make this wonderful, simple desssert.

Honeyed Fig Crostada


Honeyed Fig Crostatas
(From Food & Wine, October 2009)

Makes 8 mini crostadas

2 1/2 cups all-purpose flour
1/4 cup plus 1 tablespoon sugar
Kosher salt
1 1/2 sticks cold unsalted butter, cut into 1/2-inch pieces
1/4 cup plus 3 tablespoons ice water
1 1/2 pounds fresh green and purple figs, each cut into wedges
5 teaspoons honey
1 teaspoon fresh lemon juice
1/4 teaspoon thyme leaves, plus small sprigs for garnish
1 egg beaten with 1 tablespoon of water

In a food processor, pulse the flour with the sugar and 1/2 teaspoon of salt. Add the butter and pulse until it is the size of peas. Add the water; pulse until the dough comes together. Pat the dough into a disk, wrap in plastic and refrigerate for 30 minutes.

On a lightly floured surface, roll out the dough 1/8 inch thick. Cut out eight 5-inch rounds, rerolling the scraps if necessary; transfer to a parchment paper–lined baking sheet and refrigerate for 30 minutes.

Preheat the oven to 375 degrees. In a bowl, toss two-thirds of the figs with 3 teaspoons of the honey, the lemon juice, thyme leaves and a pinch of salt. Arrange the figs on the dough rounds, leaving a 1/2-inch border all around. Fold the edges over the figs and brush the dough with the egg wash. Chill for 30 minutes.

Bake the crostatas for 35 minutes, rotating halfway through baking, until the crusts are golden. Let stand for 10 minutes.

Gently toss the remaining figs with the remaining 2 teaspoons of honey. Transfer the crostatas to plates, top with the figs and thyme sprigs and serve.

Printable Recipe

Stumble Upon Toolbar

Friday, October 16, 2009

John Dory with Tomato-Olive Relish

John Dory with Tomato-Olive Relish

I often complain about SoCal in the "fall", but there is something I do love about living here. Even though the weather is fluctuating between rain (2 days ago) and 90 degree temps (today), the farmers market is the perfect mix of the bridge from summer to fall. Over the past weekend, I noticed the market was full of fall goodies. Squash, pomegranates, grapes, and apples were crowded into many baskets. At the same time, the remnants of late summer were still lingering. There were plenty of figs, summer squash, and tomatoes. This was especially lucky for me as I didn't get to play with summer produce as much as I wanted during my short stint at Grey Gardens. Organic roma tomatoes were a steal at a dollar a pound. I picked up a bunch of them and slow roasted some and made this phenomenal and simple dish with the rest. I wasn't able to find halibut and the guy at the market told me that John Dory was the closest thing. Bonus points for it being inexpensive, but I am not too sure about it's sustainability. One good thing about John Dory is that it is firm and mild and able to withstand the bold flavors of the relish. Plus this is quick cooking for a weeknight meal. I need to do some more research on sustainable fish, but I did enjoy this easy and healthy dinner quite a bit.

John Dory with Tomato-Olive Relish


Tomato-Olive Relish
(Adapted from Once Upon a Plate)

1 cup tomatoes, seeded and diced
1/4 cup finely diced red onion
1/4 cup chopped ripe olives

1 Tablespoon capers, rinsed
2 tablespoons fresh lemon juice
1 tablespoon parsley
1/8 teaspoon salt, or to taste
Freshly ground pepper
1 large garlic clove, minced

Gently mix all of the ingredients together and season with salt and pepper to taste. Spoon over freshly cooked shrimp, fish, chicken, or meat.
Printable Recipe

Stumble Upon Toolbar

Wednesday, October 14, 2009

Daring Cooks: Quick Vietnamese Chicken Pho

Chicken Pho

The October 2009 Daring Cooks’ challenge was brought to us by Jaden of the blog Steamy Kitchen. The recipes are from her new cookbook, The Steamy Kitchen Cookbook: 101 Asian Recipes Simple Enough for Tonight's Dinner.

When I saw that this month's Daring Cook's challenge was pho, I knew immediately I had to participate. Pho is one of my favorite foods ever, but it has been a long time since I have had it. I normally crave pho in the cooler winter months, but LA has been devoid of that kind of weather...until now. This past week it has cooled down considerably from the 100+ degrees we were experiencing only a few short weeks ago. It's actually even raining here. What? It never rains in southern California! Anyway...this dish is super easy to make thanks to Jaden's helpful tips. Toasting the spices deepens the flavor and using store bought stock makes things fast.

Star anise

Toasting Spices

I personally don't like my pho overloaded with noodles so I used a little bit less. Other than that, I just halved everything else in the recipe and had enough for about 3 servings. I love my pho spicy, but I didn't have any sriracha on hand and I completely forgot to pick up jalapenos at the farmers market on Sunday morning right before I made this. Nevertheless, I loved the flavor that a few spices and other seasonings added to the broth and it smelled and tasted like it had been cooking all day. For my accompaniments, I went with limes, cilantro, onions, and thai basil.

Pho Accompaniments

This was pho-king fantastic!

Chicken Pho

Quick Chicken Pho

2 tbsp. whole coriander seeds
4 whole cloves
2 whole star anise
2 quarts (2 liters/8 cups/64 fluid ounces) store-bought or homemade chicken stock
1 whole chicken breast (bone in or boneless)
½ onion
1 3-inch (7.5 cm) chunk of ginger, sliced and smashed with side of knife
1 to 2 tbsps. sugar
1 to 2 tbsps. fish sauce
1 lb. (500 grams/16 ounces) dried rice noodles (about ¼ inch/6 mm wide)

Accompaniments:
2 cups (200 grams/7 ounces) bean sprouts, washed and tails pinched off
Fresh cilantro (coriander) tops (leaves and tender stems)
1/2 cup (50 grams/approx. 2 ounces) shaved red onions
1/2 lime, cut into 4 wedges
Sriracha chili sauce
Hoisin sauce
Sliced fresh chili peppers of your choice

To make the Chicken Pho Broth: heat a frying pan over medium heat. Add the coriander seeds, cloves and star anise and toast until fragrant, about 3-4 minutes. Immediately spoon out the spices to avoid burning.

In a large pot, add all the ingredients (including the toasted spices) and bring to a boil. Reduce the heat to medium-low and let simmer for 20 minutes, skimming the surface frequently.

Use tongs to remove the chicken breasts and shred the meat with your fingers, discarding the bone if you have used bone-in breasts.

Taste the broth and add more fish sauce or sugar, if needed. Strain the broth and discard the solids.

Prepare the noodles as per directions on the package.

Ladle the broth into bowls. Then divide the shredded chicken breast and the soft noodles evenly into each bowl.

Have the accompaniments spread out on the table. Each person can customize their own bowl with these ingredients.

Stumble Upon Toolbar

Tuesday, October 13, 2009

Pumpkin Swirl Brownies

Pumpkin Swirl Brownies

This past weekend I was so determined to make something with pumpkin. The weather has finally cooled down (at least temporarily) and it has me in the mood for warming foods and baking things in my mini oven. My Twitter friends were overwhelmingly in support of pumpkin brownies versus pumpkin blondies so that's what I made. Although, let's be honest...I think pumpkin blondies are in my very near future. I am on a blondie/brownie kick lately. One of the things I am getting used to is baking in a very small kitchen, but it's kind of fun...except when flour gets everywhere.

Pumpkin Swirl Brownies

These were fun to bake and despite my reservations about the swirling affect, they came out really well. They looked so pretty and made my apartment smell like fall. The finished result was very good too. The brownies were a bit cakier than I prefer my brownies to be, but after storing them overnight, they thickened up a bit. The best part? They were a total hit at work. I kind of felt like a rockstar bringing these in. I didn't taste the cayenne at all so if I make these again, I may try adding a full quarter teaspoon and to get that fudgy consistency, I will use less flour, but otherwise these were a good experiment in fall baking. I can't wait to make more pumpkin recipes this season. What are your favorite pumpkin treats?

Pumpkin Swirl Brownies

Pumpkin-Swirl Brownies
(Slightly adapted from Everyday Food)

Makes 16 brownies

8 tablespoons (1 stick) unsalted butter, plus more for pan
6 ounces bittersweet chocolate, chopped
2 cups all-purpose flour
1 teaspoon baking powder
1/4 teaspoon cayenne pepper
1/2 teaspoon salt
Scant 1 1/2 cups sugar
4 large eggs
1 tablespoon pure vanilla extract
1 1/4 cups solid-pack pumpkin
1/4 cup vegetable oil
1 teaspoon ground cinnamon

Preheat oven to 350 degrees. Butter a 9-inch square baking pan or dish. Line bottom of pan with parchment paper; butter lining.

Melt chocolate and butter in a heatproof bowl set over a pan of simmering water, stirring occasionally until smooth.

Whisk together flour, baking powder, cayenne, and salt in a large bowl; set aside. Put sugar, eggs, and vanilla in the bowl of an electric mixer fitted with the paddle attachment; beat until fluffy and well combined, 3 to 5 minutes. Beat in flour mixture.

Divide batter between two medium bowls (about 2 cups per bowl). Stir chocolate mixture into one bowl. In other bowl, stir in pumpkin, oil, and cinnamon. Transfer half of chocolate batter to prepared pan smoothing top with a rubber spatula. Top with half of pumpkin batter. Repeat to make one more chocolate layer and one more pumpkin layer. Work quickly so batters don't set.

With a small spatula or a table knife, gently swirl the two batters to create a marbled effect. Sprinkle with nuts.

Bake until set, 40 to 45 minutes. Let cool in pan on a wire rack. Cut into 16 squares.

Printable Recipe

Stumble Upon Toolbar

Monday, October 12, 2009

Daring Bakers: Vols Au Vent

Daring Bakers: Vol Au Vents

The September 2009 Daring Bakers' challenge was hosted by Steph of A Whisk and a Spoon. She chose the French treat Vols-au-Vent based on the puff pastry recipe by Michel Richard from the cookbook Baking With Julia by Dorie Greenspan.

Well, it's a bit late, but better than never, right??? With my move last weekend and me not cooking at Grey Gardens, it took a bit longer for me to get to last month's Daring Bakers challenge. I am so glad I finally made it! Puff pastry has always been one of those things that I have been scared to try and not afraid to buy at the store for convenience. When I saw that the September challenge was puff pastry and more specifically vols-au-vent, I planned on making my filling the fig, blue cheese, and bacon combo I did for the tart last week...and then life got away from me. Even though I am not fully unpacked, I am definitely way more settled in to my new apartment than I ever was in Grey Gardens. Despite my teeny, tiny kitchen, I am finding ways to make things work and really loving spending my weekends cooking again.

Daring Bakers: Vol Au Vents

After a great workout with Erin at Equinox, I was more ready to attack something buttery. Honestly though, for how much pastry this recipe makes, it really doesn't use that much butter. I halved the recipe knowing I would have a lot of pastry left over and I was right. After carefully measuring the ingredients and doing my first two turns, I thought to myself "this is easy and actually kind of fun". All in all, this was a fun recipe to make and not as difficult as I thought it would be. The key to making puff pastry is to have a lot of patience because most of the time you aren't doing anything. Watch part of a movie, do some dishes, clean your bathroom because you will have time for all of those things and then some.

My vols-au-vent came out a little crooked, but I didn't mind. I filled them simply with some Greek yogurt from Stoneyfield. I sweetened the plain yogurt with a bit of agave and left the blueberry yogurt alone. Topping them off with a few pomegranate arils was a crunchy, tart way to finish these off. I only made a few vols-au-vent and devoured them all in one sitting. The only problems I ran into were a bit of butter being exposed during the turns and the pastry rising crookedly. I like to think it adds character. I had a lot of fun with this and can't wait to come up with delicious ways to use up the leftover puff pastry.

Vol Au Vent

To get the puff pastry recipe, please visit our gracious host, and to see how the other Daring Bakers did, click here.

Stumble Upon Toolbar

Friday, October 9, 2009

Quinoa Salad with Figs, Pomegranates, Spinach and Chicken

Quinoa Fig and Pomegranate Salad

A few weeks ago on Twitter, Diana professed her love for quinoa (#quinoaqlub). It got me thinking about how much I love quinoa (see here, here, here, here, here...you get the picture), but it's been approximately six months since I have cooked with it. I knew I had to change that especially when I saw all the awesome sounding quinoa dishes people were coming up with. As I mentioned the other day, I split a basket of figs with Mary. Some went in to that amazing tart and the rest went in to this salad. To make the salad a bit heartier, I added some cubes of cooked chicken and to make it prettier (and healthier) I added chopped spinach and pomegranate seeds. It was the perfect bridge of late summer into fall, at least when it comes to food. I didn't want the dressing to overwhelm the fruit flavors so I only added a couple of splashes of balsamic and a small drizzle of oil. My only problem was that I overcooked the quinoa a bit because it my first time using my mini stove and I wasn't sure about the controls. Regardless, this salad came together quickly and easily and it was a wonderfully satisfying lunch.

Quinoa Fig and Pomegranate Salad (eh)


Quinoa Salad with Figs, Pomegranates, Spinach and Chicken
(By Esi)

Makes 2 servings

1/2 cup quinoa, rinsed
4-5 chicken tenders, cut into chunks
1-2 handfuls figs, sliced
1/4 cup pomegranate seeds
2 handfuls baby spinach, roughly chopped
Balsamic vinegar to taste
Extra-virgin olive oil to taste
Salt and pepper

Lightly season this chicken with salt and pepper and cook in a bit of olive oil in a medium skillet until cooked through. Set aside to cool slightly. In a medium saucepan, bring the quinoa to a boil with 1 cup of water. Reduce to a simmer, cover and cook 12-15 minutes until the water is absorbed.

In a medium bowl, combine the quinoa, chicken, figs and spinach. Season lightly with balsamic vinegar, a bit more oil if desired and salt and pepper to taste. Serve warm, topped with pomegranate seeds.

Printable Recipe

Stumble Upon Toolbar

Thursday, October 8, 2009

Double Chocolate Bitter Brownies

Double Chocolate Bitter Brownies

Back in August (doesn't that seem SO long ago?), I was contacted by Xagave about sampling their brand of agave nectar. I enjoy cooking with alternative sweeteners and it's been a while since I have used them so I thought it would be a good opportunity. I uncovered the nectar and cookbook in my move and thumbed through quickly to see what I could make with what I had on hand. These brownies caught my eye immediately. I have to admit, I was a little doubtful about replacing all of the sugar in this recipe with agave. I should not have worried. These brownies came out thick and fudgy and really not too sweet at all. Instead of nuts, I added chocolate chips to make these a bit more rich and I used regular all-purpose flour because I was out of whole wheat. They would have gone great with some ice cream but I haven't had a chance yet to pick some up (or make some). They seemed to be a hit when I shared them at work too. To learn more about Xagave's brand of organic agave nectar, click here and to find out more of the health benefits of agave nectar, click here.


Double Chocolate Bitter Brownies
(From the Delicious Meets Nutritious Cookbook from Xagave)

Makes 9 brownies

1/2 cup butter
2/3 cup agave nectar
2/3 cup unsweetened cocoa
2 eggs
1 teaspoon vanilla
2/3 cup flour (can also use whole wheat flour)
1/2 teaspoon baking powder
1/4 teaspoon salt
1/2 cup semi sweet chocolate chips

Preheat the oven to 325 degrees. Grease and lightly flour an 8x8 baking pan.

Melt the butter in a microwave. Set aside to cool slightly. In a medium bowl, whisk together the agave nectar and cocoa powder until smooth. Whisk in the eggs, vanilla, and cooled butter.

In a small bowl, mix the flour, baking powder, and salt. Mix the flour mixture into the cocoa mixture and then fold in the chocolate chips. Bake 25-30 minutes until the edges begin to pull away from the sides of the pan.

Printable Recipe

Stumble Upon Toolbar

Tuesday, October 6, 2009

Fig, Bacon, and Gorgonzola Tart

Fig Bacon and Gorgonzola Tart

Miss me?? Well I have certainly missed making food and sharing it with the world. I am finally moved out of Grey Gardens and (mostly) unpacked in my new place. Plus, I can cross another item off of my 101 list. One of my goals on the list was to live alone and I have finally done just that. Yay! Man, it's been so long since I have posted a recipe here I forgot how long it took to compose a recipe post so bear with me today. The other day I finally got to meet someone I have been wanting to see in person for a long time. I first discovered Mary's blog last year when she posted these cupcakes. I left a comment on that post and we have been commenting and Tweeting ever since. When Mary suggested meeting at the farmers market, I jumped at the opportunity. I was so bummed I didn't get to go to BlogHer Food a couple of weeks ago so any chance I get to meet other food bloggers, I try to make it happen. Well let me tell you, Mary is just awesome!! I felt like I was chatting with an old friend. Plus, she got to meet salad boy so you know I haven't just been making him up! :)


Fig Bacon and Gorgonzola Tart

Anyway, on to this tart. Mary and I shared a basket of figs. Even though Grey Gardens had a huge fig tree in the backyard, I never got to enjoy the bounty. I think the gardener was stealing them for himself. I had planned on making this tart months ago and when last month's Daring Bakers challenge was puff pastry, I wanted to do this as the filling, but I still haven't gotten around to making that yet. I plan on it though, so stay tuned. This tart. My goodness it is incredible. It's a simple and classic combination that just tastes so good. The salty cheese and bacon were a wonderful back drop to the buttery pastry and mellow sweetness of the figs. I had originally planned on doing a drizzle of honey or a balsamic reduction, but I kind of forgot until after the fact and honestly, it didn't really need it in the end. I could have (and almost did) eaten all of these tarts in one sitting. I'm so excited to be back in the kitchen and once I recover from my move expenses, I hope to be sharing recipes on a more regular basis.


Fig Bacon and Gorgonzola Tart
(By Esi)

Makes 4 servings

1 sheet puff pastry, cut into 4 squares
Handful of figs, cut in half
4 slices bacon, chopped
1-2 ounces Gorgonzola cheese, crumbled
Honey for drizzling (optional)
1 egg beaten with 1 tablespoon of water for egg wash

In a large skillet, cook the bacon over medium-high heat until crisp. Meanwhile, score each piece of puff pastry so that there is a one-inch border around. Prick the inside of the square with a fork all around.

Preheat the oven to 400 degrees and line a baking sheet with foil or parchment paper. Arrange the figs in a single layer over the puff pastry. Brush the exposed edges of the pastry with egg wash. Bake 15-20 minutes until the pastry is puffed and golden. Sprinkle the top with bacon and the crumbled Gorgonzola. Serve warm.

Printable Recipe

Stumble Upon Toolbar