Tuesday, June 29, 2010

Blueberry Crumb Bars

Blueberry Crumb Bars

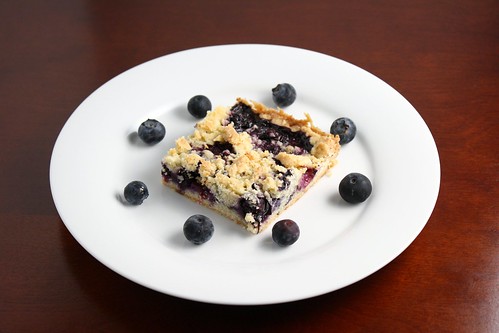
I started my staycation with a night out at the Hollywood Bowl. We saw the Grease singalong and it was so much fun! I used to watch Grease often when I was in high school, but it's been a few years since I've seen it. Turns out watching that movie again is like riding a bicycle. All the familiar words came right back to me. Of course when you go to the Hollywood Bowl, part of the whole experience is picnicking beforehand. The group I went with was serious about their picnic. They even had a whole spreadsheet devoted to who was bringing what. I knew I couldn't let the group down, but I didn't have much time to spend on a great treat for the group since part of the evening prior was spent baking brownies. Luckily these bars are easy, but so good. I am really loving blueberries this season. The crumb with the slightly lemony crust accentuates the blueberries and provides a great base for their juicy goodness. I've been seeing these crumb bars a lot around the blogosphere lately and it's not hard to tell why. They are well worth the slight effort!


Blueberry Crumb Bars
(Adapted from AllRecipes via Jessica's Dinner Party and Smitten Kitchen)


Makes 9+ bars (depending on how you cut them)

For the crust and crumb topping
1/2 cup white sugar
1/2 teaspoon baking powder
1 1/2 cups flour
Pinch of salt
Zest of 1/2 of a lemon
1/2 of a lightly beaten egg
1 stick cold, unsalted butter, cut into pieces

For the blueberry filing
2 cups fresh blueberries
Juice of 1/2 of a lemon
1/4 cup white sugar
2 teaspoons cornstarch

Preheat the oven to 375 degrees. Grease an 8 or 9 inch baking dish and set aside.

To make the crust:
In a large bowl, mix the sugar, baking powder, flour, salt, and lemon zest. Add the egg and then the butter pieces and use a dough blender or knives to cut the butter into the flour mixture. Press half of the dough into the greased pan.

In a large bowl, mix the blueberries, lemon juice, sugar, and cornstarch until well combined. Spread the mixture evenly over the crust. Crumble the remaining dough over the blueberries.

Bake for 45 minutes until the crust is lightly browned. Cool completely before cutting into bars.

Printable Recipes

Stumble Upon Toolbar

Monday, June 28, 2010

Rocky Road Brownies

Rocky Road Brownies


This past Friday was my last day at my job. Of course during my time there, I became known as the crazy baking girl so I could not leave without baking my former coworkers one last treat. I wanted it to be something pretty outstanding, but also simple. These brownies are so good. They are ridiculously thick and fudgy which is just the way I like them and the marshmallow, nut, and chocolate combo puts them over the top! If I'd had my way, I would have had all of them, but my hips don't need them so I was happy to share them. I'm pretty sure my coworkers enjoyed them and it was nice to end my time at that company on a sweet note. Now I'm on a bit of a vacation (actually a staycation) and enjoying some much needed rest. I plan on cooking a ton and I can't wait to share what I make!


Rocky Road Brownies
(From Everyday Food)


Makes 16 brownies

1/2 cup (1 stick) unsalted butter, cut into pieces, plus more for pan
1 bag (12 ounces) semisweet chocolate chips
1/2 cup granulated sugar
1/2 cup packed light-brown sugar
1/2 teaspoon salt
2 large eggs
3/4 cup all-purpose flour (spooned and leveled)
1 cup miniature marshmallows
1/2 cup chopped nuts, such as cashews, pecans, or walnuts

Preheat oven to 350 degrees. Butter an 8-inch-square baking pan. Line bottom with parchment paper, leaving an overhang on two sides; butter paper.

In a heatproof bowl set over (not in) a saucepan of simmering water, combine butter and 1 cup chocolate chips. Heat, stirring occasionally, just until melted, 3 to 5 minutes.

Remove mixture from heat; stir in sugars and salt, then eggs, and finally flour, stirring just until combined. Spread batter evenly in prepared pan. Bake until a toothpick inserted in center comes out with moist crumbs attached, 30 to 35 minutes.

Remove from oven, and sprinkle with remaining chocolate chips, then marshmallows and nuts. Bake until chocolate is shiny and marshmallows are puffed, about 5 minutes. Cool completely in pan. Using paper overhang, lift cake onto a work surface; cut into 16 squares.

Printable Recipe

Stumble Upon Toolbar

Friday, June 25, 2010

Brown Sugar Cakelets with Brown Sugar Cream Cheese and Berries

Brown Sugar Cakelets with Brown Sugar Cream Cheese Filling and Berries


Apparently my blog has turned into a baking blog. Not really, but I have many baked goods recipes to share so bare with me. Despite all the cookies I baked last week, I was craving something sweet towards the end of the weekend so I made these little cakelets. I couldn't justify all the fat for just me so I used nonfat milk and nonfat yogurt in the batter. The batter comes together so quickly and these cakelets are a really great alternative to shortcakes which I personally don't like because I detest whipped cream. Call me crazy, but it's true. Despite the substitutions, these cakes came out light and moist and surprisingly not too sweet. The brown sugary cream cheese was the perfect compliment to highlight the summer berries. The original recipe calls this an alternative to coffee cake for breakfast, but I think it makes an excellent summer dessert.


Brown Sugar Cakelets with Brown Sugar Cream Cheese and Berries
(Adapted from Serious Eats)


Makes 6 cakelets

For the cakelets:
4 tablespoons unsalted butter, melted and cooled
3/4 cup all-purpose flour
1 teaspoon baking powder
3/4 fine sea salt
1 egg, at room temperature
1/2 cup packed brown sugar
2 tablespoons milk mixed with 2 tablespoons plain yogurt
1/2 teaspoon vanilla extract

For the brown sugar cream cheese filling:
2 ounce cream cheese at room temperature
2 tablespoons brown sugar
1 tablespoon plain yogurt

Seasonal berries, roughly chopped if desired

To make the cakelets:
Preheat the oven to 350 degrees. Grease six cups of a standard muffin tin and set aside.

In a medium bowl, whisk together the flour, baking powder, and salt. Set aside.

In a large bowl, whisk the egg until frothy. Add the brown sugar and whisk well to combine.

Add the flour mixture to the egg, mixing until just incorporated. Stir in the milk and yogurt mixture, the melted butter, and the vanilla extract.

Fill each muffin tin about halfway full. Bake for about 15 minute or until a toothpick inserted in the center of the cake comes out clean. Let the cakes cool in the pan for one minute then turn out to a wire rack. Allow the cakes to cool completely.

To make the filling:
In a small bowl, whisk together the cream cheese, brown sugar, and yogurt until fluffy and smooth.

Cut each cakelet in half. Spread each half with some of the cream cheese mixture. Top with berries and serve.

Printable Recipe

Stumble Upon Toolbar

Wednesday, June 23, 2010

Compost Cookies

Compost Cookies

Last week I was faced with the task of completing a lot more baking than I normally get done in one day let alone three. A few friends of mine were shooting a short film with the subject being cookies and guess who got stuck with the job of making all the cookies for the film? Of course I couldn't complain because I knew I would be able to tie them in to the blog, but it was definitely a lot of hard work to get them done on time. Luckily I got them done just under the wire and it was fun to test out some new recipes and techniques. First up were the famous "compost" cookies which are sold at Momufuku Milk Bar in NY. After my fabulous success with the crack pie, I was definitely excited to try another one of their popular recipes. These cookies are interesting in that you cream the butter, egg, and sugar mixture for a full ten minutes. In that time, the sugar dissolves into the butter and the mixture doubles in size. It's a pretty amazing transformation and nothing I had ever tried. I tried to keep my mix-ins on the not too sweet side, but it was the perfect opportunity to use up the butterscotch chips and Heath toffee bits I've had laying in my kitchen for longer than I care to admit. To counteract the sweetness, I used white cheddar crackers, pretzels, and plain kettle chips as my salty mix-ins. The kettle chips were a bit lost in the mixture, but I loved the flavor and texture of the white cheddar crackers and pretzels. I would definitely add more of them next time. These cookies are fun to make and even better to eat. Don't tell anyone, but I had two of them instead of a real dinner the night I made them. Believe me, it's worth it.


Compost Cookies
(From Christina Tosi)


Makes about 2 dozen cookies

1 cup butter, at room temperature
1 cup sugar
3/4 cup light brown sugar
1 tablespoon light corn syrup
1 teaspoon vanilla extract
2 large eggs
1 3/4 cups all-purpose flour
2 teaspoons baking powder
1 teaspoon baking soda
2 teaspoons Kosher salt
1 1/2 cups of your favorite baking ingredients (I used chocolate chips, butterscotch chips, and Heath toffee bits)
1 1/2 cups of your favorite snack foods (I used pretzels, kettle chips, and white cheddar crackers)

In a stand mixer fitted with the paddle attachment, cream the butter, sugars and corn syrup for 2-3 minutes until fluffy and pale yellow in color. Scrape down the sides of the bowl with a spatula.

On a lower speed, add the eggs and vanilla to incorporate. Increase the mixing speed to medium-high. Set a timer for ten minutes and let the mixer go.

Meanwhile, whisk together the flour, baking powder, baking soda, and salt. When the ten minutes are up, reduce the speed of the mixer to low and add the flour mixture. Mix for 45-60 seconds until the dough just comes together. Do not over mix. Scrape the sides of the bowl with a spatula.

Continuing on low speed, add the baking ingredients and mix for 30-45 seconds until the are incorporated. Add in the snack foods and again, mix until just incorporated.

Line a few baking sheets with parchment paper. Using a standard ice cream scoop, portion the cookie dough onto the parchment paper, about 3 inches apart. Wrap the baking sheets in plastic wrap and refrigerate for one hour or up to one week.

Preheat an oven to 400 degrees. Bake the cookies 9-11 minutes until the cookies are browned on the edges and just beginning to brown in the center. Cool the cookies completely on the sheet pan before transferring to a plate or airtight container for storage. Cookies will keep fresh for up to 5 days stored in an airtight container at room temperature.

Printable Recipe

Stumble Upon Toolbar

Monday, June 21, 2010

Poached Eggs with Prosciutto Mozzarella and Basil

Poached Eggs with Prosciutto Mozzarella and Basil

I hope everyone had a wonderful weekend. I certainly did. It was just the right amount of lazy and productive, plus an amazing lunch with some fabulous ladies! Things are really great right now and the next month is going to bring some huge changes to my life. I've become one of those people I usually make fun of who says things like "life is good". It's bizarre! Another bizarre thing is that besides an insane amount of cookie baking last week, my kitchen is hardly being used right now. I haven't made much besides last week's quinoa and I'm ok with that. I'm too busy enjoying the world around me so posting will continue to be light perhaps until my "staycation" next week. Thankfully this recipe hardly needs any cooking and it's really more of a method than an actual recipe. It's wonderfully simple and made me so happy that I had this twice this past weekend. You really can't go wrong with creamy cheese and eggs and salty prosciutto. The only thing this needs upon completion is some crusty bread to sop up the egg yolks..and of course a glass of wine!

Poached Eggs with Prosciutto Mozzarella and Basil


Poached Eggs with Prosciutto Mozzarella and Basil
(From The Kitchn)


1-2 eggs per person, poached
Fresh mozzarella cheese, torn into chunks
Prosciutto, torn into pieces
Fresh basil, roughly chopped
Extra virgin olive oil for drizzling
Kosher salt and freshly ground black pepper

Arrange the prosciutto and mozzarella on a plate. Top with the poached eggs and a bit of basil. Drizzle the whole thing with olive oil and a pinch of salt and plenty of freshly ground pepper.

Printable Recipe

Stumble Upon Toolbar

Friday, June 18, 2010

Yatai Ramen Twist at Breadbar

When I heard Breadbar was going to have a pop up featuring ramen, I immediately IM'ed my friend Kris (one of my favorite dining partners) to ask when he wanted to go. We figured out a time that worked for both of us and I quickly made a reservation. I had been craving ramen again after a recent trip we made to Ramen-ya so Monday night could not arrive soon enough.

According to the Breadbar site, "Yatai" is a small, mobile food stand that sells ramen and other hot foods. Apparently these stands are frequented by businessmen after a long work day so this dinner was perfect for me after a (not so long) work day.

Yatai at Breadbar

Yatai at Breadbar

A few early reviews I saw of Yatai were all great and after reading the short menu several times, I already knew what I would be ordering. I tend to decide what I will have before I go to a restaurant because I can be indecisive if asked to make a spontaneous dining choice.

Spicy Miso Ramen

I went with the spicy miso ramen which came in a rich broth with pork belly, a boiled egg, bamboo shoots, and seaweed. This was a great choice. The noodles were cooked al dente and had a nice chewy consistency. The pork belly was tender and the broth was richly flavored, but not heavy in consistency.

Kris loves gyoza so we ordered both versions that were available. I thought they would come out as an appetizer with our soup, but they came at the same time. I thought the kale gyoza would be a little boring, but they were not at all. The kale was seasoned well and there was a mild onion flavor as well.

Kale Gyoza

I've never eaten pigs' feet, but I decided to be adventurous and try a pigs' feet gyoza. It was fine, but I didn't have more than one. It was sort of like eating ground pork, but with a bit mushier consistency. Both versions had a nice crispy sear on the bottom.

Pork Feet Gyoza

I only tried a bit of Kris' foie gras ramen (one of the "Twist" ramen options), but I liked what I had. In fact, the whole meal was great, I may try and go again before the series is over. Yatai ramen twist is running Mondays through Saturdays through July 24th so there is still plenty of time to get your ramen on!

Yatai Ramen Twist at Breadbar
8718 W. Third Street
Los Angeles, CA 90025
(310) 205-0124
http://www.breadbar.net/

Stumble Upon Toolbar

Wednesday, June 16, 2010

Spicy Garlic Shrimp with Kale and Quinoa

Spicy Garlic Shrimp with Kale and Quinoa

I've got a confession to make: Lately, I've been a little bored by quinoa. When I first discovered the superfood a couple of years ago I used it in everything from muffins, to burgers, to salads, and cakes. I got a little burned out on the stuff and turned to other grains like farro, spelt, and wheatberries. So it was quite a surprise to me, when I found myself adding a box of quinoa to my Trader Joes basket a couple of weeks ago. I thought to myself "This is red quinoa. Normally you only cook with the brown quinoa. This could be different, new. Maybe this will get you excited about a food you should be eating a lot more of again". So last night, I got to cooking, and guess what? I love quinoa again!! This meal is super fast. While the quinoa is cooking, you can prep and cook the shrimp so everything is ready in about twenty minutes. There's so much flavor in the garlicky, spicy, and slightly tangy sauce. For me, the garlic flavor was even more pronounced since I used a roasted garlic tomato sauce from my beloved TJ's. So now that I'm excited by quinoa again, I want to know what are your favorite ways to use this miracle seed?


Spicy Garlic Shrimp with Kale and Quinoa
(From Healthy Green Kitchen)


Makes 2 servings

For the quinoa:
1 cup quinoa, rinsed
1 1/2 cups water
Large pinch of sea salt

For the shrimp:
1 tablespoon extra-virgin olive oil
1 tablespoon butter
2 garlic cloves, minced
1/2 pound shrimp, peeled and deveined
1 small bunch of kale, roughly chopped (about 3 cups)
1/2 cup tomato sauce (I used roasted garlic sauce)
Juice from 1/2 lemon
2 pinches red pepper flakes
Coarse sea salt to taste
Freshly grated Parmesan for serving, optional

In a large saucepan, bring the water, quinoa, and salt to a boil. Reduce to a simmer, cover and cook until the water is absorbed, about 15-20 minutes. Let stand, covered for 5 minutes and then fluff with a fork. Set aside.

In a large skillet, heat the oil and butter over medium heat. Add the garlic and cook until fragrant, about 1 minute. Add the shrimp and kale. Cook until the shrimp are pink and cooked through and the kale has wilted. Stir in the tomato sauce and cook for another minute. Remove the pan from the heat and stir in the lemon juice and red pepper flakes. Season with salt as needed.

Serve the shrimp and kale mixture on top of the quinoa and top with Parmesan if desired.

Printable Recipe

Stumble Upon Toolbar

Monday, June 14, 2010

Strawberry Cheesecake Ice Cream

Strawberry Cheesecake Ice Cream

In the last week I have made two different versions of strawberry cheesecake ice cream. Some may call me crazy, but the reality is that I am trying to test recipes more before I post them here and the first one was just not so great for me to share in words though you can see a picture of it below. That said, I had to try again...like soon...ok, well, immediately. The first recipe I tested use a standard ice cream base with strawberries and cream cheese mixed in. It was was so bland and none of the flavors came through. The second recipe which I've chosen to share uses a cheesecake ice cream as the base with strawberries mixed in. It's hardly necessary, but I served this with crumbled graham crackers which add the illusion of a crust. This ice cream is to die for and totally a great homemade version of one of my favorite Ben and Jerry's flavors. A couple of notes about the recipe:

- I used the original measurements, using my kitchen scale, but it's pretty easy to convert them using a culinary converter. However, I highly recommend getting a scale because it makes recipes so much easier

- Mashing the strawberries in a food processor is way easier and less time consuming than doing it with a fork. Unless you have some major aggression to get out, I suggest going with the easy way

- My ice cream maker suggests churning ice cream for 20-30 minutes. After 40 minutes this ice cream was nowhere near frozen, but I turned it out into a container and it froze beautifully overnight. The consistency remains creamy and soft days later.

(The failed version. Pretty, but not good enough to eat)
Strawberry Cheesecake Ice Cream

Strawberry Cheesecake Ice Cream
(From Almost Bourdain)


175 milliliters milk
200 grams caster sugar
125 grams cream cheese, at room temperature
1/2 teaspoon pure vanilla extract
1 egg
350 milliliters heavy cream, lightly whipped
125 grams strawberries, roughly chopped

Smash chopped strawberries in a small food processor or with a fork. Set aside

Heat the milk in a small saucepan while it's getting warm, beat together the sugar. cream cheese, vanilla and egg in a bowl.

Slowly pour the hot milk into the cream cheese mixture while whisking. Once the mixture is combined, pour it into a large saucepan over medium heat. Cook, until the mixture has thickened and become a velvety custard that can coat a wooden spoon.

When it's thickened, pour the cream cheese mixture into a large bowl and let it cool. Add the heavy cream and gently stir in strawberries. Churn in an ice-cream maker according to manufacturer's instructions. The mixture may not freeze all the way in the ice cream maker. Pour it into a container and allow to freeze in the freezer overnight.

Printable Recipe

Stumble Upon Toolbar

Thursday, June 10, 2010

Fried Rice with Beef

Fried Rice with Beef

In the last week I have cooked little to not at all. Luckily, I have a few saved recipes to share. I made this several weeks ago, but I'm just now getting around to sharing it. After a long week at work, I like to treat myself to a little takeout, but sometimes I prefer to recreate takeout classics at home. It's much cheaper and I control exactly what goes into my food. This time I chose to use some grass fed beef from the farmers market and a farm fresh egg. Since I prepped all my ingredients the previous night, this meal was a cinch and came together super fast. I preferred to top my portion with a fried egg so that creamy yolk could get all mixed up with the rice, but subsequent servings had an egg scrambled in. This is just one of a million ways to serve fried rice. I'm thinking my next version will have some more seasonal vegetables...


Fried Rice with Beef
(Adapted from Sea Salt with Food)


Makes 4 servings

200 grams ground chuck
1 tablespoon peanut oil
1/2 yellow onion, diced
4 cloves garlic, chopped
2 cups cold cooked rice
Soy sauce to taste
Oyster sauce to taste
4 Eggs
1-2 scallions, thinly sliced
Kosher salt to taste
Ground black pepper

In a large skillet or wok, heat the oil over medium high heat. Add the beef and cook until the beef is cooked through, season lightly with salt and pepper. Using a slotted spoon, remove the beef from the pan and set aside.

Add the yellow onion and garlic to the pan. Cook for about 5 minutes until the onions have softened slightly, but still have some bite. Add the rice to the pan and stir to combine. Add soy sauce and oyster sauce and adjust the seasonings to taste. Add the beef back to the pan and stir to combine. Season with salt as needed and plenty of freshly ground black pepper.

In a small frying pan, fry the eggs. Alternately, you can scramble the eggs and stir them in to the rice. Serve the rice topped with a fried egg and Top each serving with some of the scallions.

Printable Recipe

Stumble Upon Toolbar

Tuesday, June 8, 2010

Apple Soju Cocktail

Apple Soju Cocktail

This past week the two things that have been on the forefront of my life are food and cocktails. This is not necessarily a bad thing. This past weekend I had the opportunity to attend not one, but two amazing food events and see a lot of fab people from all over town. Of course I was too busy eating and drinking to take pictures, but believe me when I say, it was an amazing time. I kicked the weekend off with LA Wine Fest on Saturday. It was a hot, sweaty affair with tons of interesting wines, and not enough food. Luckily we made up for the lack of sustenance with a trip to Jitlada Thai immediately after. I would have loved to fast, but the next day I had Taste of the Nation to look forward to. The amount of food was simply overwhelming. Highlights for me were the beef skewers from Chaya, the pork belly from Mercantile, and the liquid olives from The Bazaar. Naturally when you're on a roll with the food and cocktails, it's hard to just stop. On Sunday I made a trip to the Bev Hills farmers market with Chrysta from Kiss My Bundt. Apples aren't really in season so they are a great deal and I got one so I could make this great drink I recently spotted on Momofuku For 2. This is really refreshing and perfect to cool off with on a warm day. The pink lady apples lend their sweetness and mild tartness to the soju and the lime water helps this effervescent drink feel light. This is a perfect sitting on the patio while watching your afternoon waste away kind of drink...not that I know what it's like to have a patio anymore, but a girl can dream, right?


Apple Soju Cocktail
(Adapted from Gourmet, October 2007)


Makes about 4 servings

1 Pink Lady apple
1 1/2 cups soju
Chilled lime flavored sparkling water
Lime wedges, optional, for serving

Cut apple into matchsticks, discarding core, then put in a pitcher and stir in soju. Let macerate, covered and chilled, at least 30 minutes.

Fill 4 glasses with ice. Strain about 1/4 cup soju into each glass, then add some apple pieces to each glass. Top off drinks with sparkling water and some of the apples. Serve with lime wedges if desired.

Printable Recipe

Stumble Upon Toolbar

Friday, June 4, 2010

Giveway Winner!!

I know it feels like forever since I posted about my blogiversary and giveaway. It's been exactly two weeks and I'm sure you're dying to know who won. There were 106 eligible entries. I numbered those entries in the order they were received and thanks to Random.org the lucky winner is #79 also known as....AMY I!! Congrats Amy. Hopefully the gift card will come in handy when you move ;) Email me your contact info to dishingupdelights [at] gmail [dot] com. Thanks to all who entered and for all the wonderful comments. Looking forward to the next year of delicious blogging!!

Stumble Upon Toolbar

Thursday, June 3, 2010

Brown Rice Pudding

Brown Rice Pudding with Strawberries

I always have friends emailing me requests for specific recipes. Sometimes I get to them right away...other times it takes me quite a bit longer depending on my mood. Two days ago, I got a request asking me for a brown rice pudding. I must admit, I had never even considered the idea before. I like rice pudding as much as the next person, but it's not something I make often because I never find myself with extra rice around. Usually if I have extra rice, it goes towards a fried rice recipe, but I was intrigued at making a pudding from it. Some of my all time favorite recipes come from ingredients I already have on hand and this pudding was no exception. I literally had everything in my kitchen so when I got off work a little earlier yesterday, I immediately set out to make this pudding. Most of the time spent on this recipe comes from cooking the brown rice, but if you already have cooked rice on hand, this comes together in mere minutes. I may use a touch less sugar next time, but man is this great for dessert...or breakfast! The cinnamon gives it some warmth, but the lemon zest brightens it up. This is creamy and decadent tasting, but with way less guilt than a regular full fat dessert. I'm so excited to try this again with a vanilla bean or extract to change up the flavor.

Brown Rice Pudding with Strawberries

Final note, there is still time to enter my blogiversary giveaway! It's a good one, check it out before it's too late!!!

Brown Rice Pudding with Strawberries
(Adapted from A Cozy Kitchen)


Makes 2 generous servings

1 cup cooked brown rice
1 cup low fat milk
1/4 cup sugar
1/2 teaspoon grated lemon zest
1/2 teaspoon warm cinnamon
Pinch of salt
Fresh strawberries, sliced for serving

In a large saucepan over medium low heat, combine the rice, milk, sugar, lemon zest, cinnamon and salt. Cook, stirring continuously until the mixture is thick and creamy, about 15-20 minutes.

Serve warm, topped with strawberries.

Printable Recipe

Stumble Upon Toolbar

Wednesday, June 2, 2010

Grilled Shrimp and Sausage Skewers with Smoky Paprika Glaze

Grilled Shrimp and Sausage Skewers with Smoky Paprika Glaze

I've never understood why people say that Memorial Day weekend is the start of summer and the start of grilling season. Summer doesn't start (officially) until late June and in southern California, it's almost always grilling season. However, I like many others took the opportunity to have a beach cookout with friends this past weekend and of course we got our grill on. When I received the June edition of Bon Appetit in the mail last week, I was immediately tantalized by the cover photo and eagerly tore through the pages to find the recipe. These were so good that I made them not once, but twice over the weekend. The spicy chicken andouille I picked up was a perfect compliment to the smoky glaze and that glaze added amazing flavor to the shrimp, tomatoes, and onion and the tomatoes were bursting with juicy warmth. Doing these on the outdoor grill gave them even more smoky flavor, but doing them inside in a grill pan still yields excellent results. There were many recipes in this month's magazine that I want to try, but I have a feeling this is going to made again very, very soon.


Grilled Shrimp and Sausage Skewers with Smoky Paprika Glaze
(Slightly Adapted from Bon Appetit, June 2010)


Makes 6 servings

3/4 cup olive oil
4-5 large garlic cloves, grated
2 tablespoons chopped fresh thyme
5 teaspoons smoked paprika
4 teaspoons red wine vinegar
3/4 teaspoon salt
1/2 teaspoon freshly ground black pepper
1/2 teaspoon dried crushed red pepper
12 uncooked extra-large shrimp
12 1-inch-long pieces chicken andouille sausage
12 cherry tomatoes
12 2-layer sections of red onion wedges

In a medium bowl, whisk together the olive oil, garlic, thyme, paprika, vinegar, salt, and both peppers. Transfer half of the glaze to a small bowl and set aside.

Heat a grill or grill pan to medium-high heat. Alternately thread pieces of shrimp, sausage, tomato, and onion onto the skewers. Brush skewers on both sides with glaze from one bowl. Grill 6-8 minutes until the shrimp are opaque, turning every couple of minutes and brushing occasionally with more glaze.

Arrange skewers on a platter and serve with the remaining bowl of glaze.

Printable Recipe

Stumble Upon Toolbar