Thursday, December 31, 2009

Best of 2009

Well, I am going to be honest with you all. I thought I was done with posts for 2009, but I couldn't let this year go by without posting some of my favorite recipes from this past year. Overall in life, the year was not so great, but blog-wise it was freaking FANTASTIC.

I celebrated my first year of blogging with a fabulous cake. Just because I mostly cook for myself, doesn't mean I don't take the time to enjoy delicious treats. Look how cute this mini slice of Perfect Party Cake is.

Perfect Party Cake Slice

One of my goals at the beginning of the year was to purchase an ice cream maker and come up with fabulous flavors. Each one I tried was equally amazing, but I really loved the tart richness of this simple buttermilk ice cream. I can't wait to make it again...after I try many more flavors of course!

Buttermilk Ice Cream

Another ice cream favorite was combining my favorite Girl Scout cookie into a frozen concoction. Need I say more??

Samoas Ice Cream

I absolutely loved grabbing souvlaki late at night when I got to go to Greece a couple of years ago. Life was made much easier when I realized I could create it at home and so easily as well!

Pork Souvlaki

Strawberries are my favorite fruit and lucky for me I live in Southern California where they are plentiful and wonderful year round. I especially love using them in desserts such as the ever so simple, but oh so amazing buttermilk cake that made the blog rounds earlier this year.

Strawberry Buttermilk Cake Slice

I also love creating desserts with a combination of sweet and savory. This galette with a savory thyme crust and a sweet and tart lemon curd made even more perfect with local Gaviota strawberries was to die for!
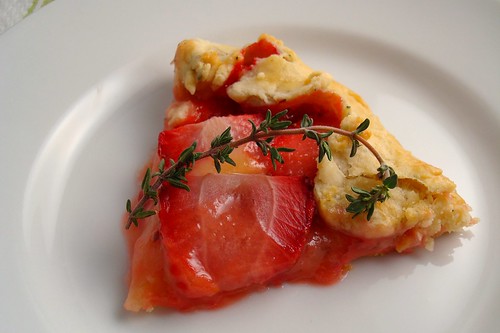
Strawberry Galette Slice

How much more can be said about one of the best grilled cheese sandwiches I have ever made and had?!

Grilled Cheese with Bacon and a Fried Egg

One of the best things of the past year was having several opportunities to meet other food bloggers. I had such a blast with everyone and I am so looking forward to many more fun times with everyone!!!!

Christina Nastassia Esi and Sonja

Food-wise it has been such a fun year, I am so excited to see what this new year and decade have in store. I hope you all enjoy a fun and safe New Years eve night and cheers for what is next to come!

Stumble Upon Toolbar

Wednesday, December 30, 2009

Italian Wedding Soup

Italian Wedding Soup

I have been wanting to make this type of soup for a year. I kid you not! Despite my refrigerator troubles, I decided to go ahead and make this yesterday. The one blessing in this whole mess is that my freezer still works so I was able to freeze the leftovers. Anyway, it was last winter when it got slightly chilly that I decided I really wanted to make an Italian wedding soup, but it never stays cold for too long here in the land of the lost, so I never got around to making it. It isn't really cold right now, but I have been craving something other than the frozen convenience foods I have been consuming lately. These meatballs could quite possibly be the best meatballs I have ever made. The spicy kick from the Italian sausage kept them interesting and using a higher fat turkey kept them moist without being mushy. Surprisingly, for an Ina Garten recipe, this is quite healthy and I made sure to add tons of extra spinach and only use a bit of the pasta called for in the original recipe. This is a great, hearty soup that won't weigh you down or have you feeling guilty after you eat it.

Italian Wedding Soup (blurry-ish)


Italian Wedding Soup
(Adapted from Ina Garten)


Makes 4-5 servings

For the meatballs:
1/2 pound ground turkey (93% lean)
1/4 pound hot Italian chicken sausage, casings removed
1/4 cup panko bread crumbs
2 teaspoons grated garlic
1 1/2 tablespoons chopped fresh parsley leaves
2 tablespoons freshly grated Parmesan, plus extra for serving
1 extra-large egg, lightly beaten
Kosher salt and freshly ground black pepper

For the soup:
1 tablespoon olive oil
1 small yellow onion, diced
1/2 cup diced carrots, cut into 1/4 inch pieces
1/4 cup diced celery, cut into 1/4 inch pieces
5 cups chicken stock
1/4 cup dry white wine
1/2 cup small pasta such as tubetini or stars
2 tablespoons minced fresh dill
6 ounces baby spinach, washed and trimmed

Preheat the oven to 350 degrees.

For the meatballs, place the ground chicken, sausage, bread crumbs, garlic, parsley, Parmesan, 1/2 the egg, 1/2 teaspoon salt, and 1/4 teaspoon pepper in a bowl and combine gently with a fork. With a teaspoon, drop 1 to 1 1/4-inch meatballs onto a sheet pan lined with parchment paper. (You should have about 16-20 meatballs) Bake for 25-30 minutes, until cooked through and lightly browned. Set aside.

In the meantime, for the soup, heat the olive oil over medium-low heat in a large heavy-bottomed soup pot. Add the onion, carrots, and celery and saute until softened, 5 to 6 minutes, stirring occasionally. Add the chicken stock and wine and bring to a boil. Add the pasta to the simmering broth and cook for 6 to 8 minutes, until the pasta is tender. Add the fresh dill and then the meatballs to the soup and simmer for 1 minute. Taste for salt and pepper. Stir in the fresh spinach and cook for 1 minute, until the spinach is just wilted. Ladle into soup bowls and sprinkle each serving with extra grated Parmesan if desired.

Printable Recipe

Stumble Upon Toolbar

Tuesday, December 29, 2009

Happy New Year and some things

Hello friends!! Well, unfortunately, I don't have a new recipe for you today. I am still dealing with my broken fridge situation and trying not to pull out my hair because my landlord is a lazy butt who refuses to deal with it. I am really, really hoping the situation is fixed today, but you never know. So instead, I wanted to take this time to wish everyone a happy early new year and tell you about a couple of things.

First, up, the ever so amazing Greg of Sippity Sup nominated me for a Homie over on one of my favorite websites, The Kitchn. I've never been nominated for anything (besides an embarrassing turn as homecoming princess in college) so it would be great if you could vote for me here.

In other awesome news, I have recently partnered with Springpad and their fabulous planners. Regular readers know that I am head over heels in love with Springpad's weekly meal planner. I use it to plan out what meals I will be making and also to generate my shopping lists. These help me stay planned and within budget (for the most part). Now you can click the "Spring It" button and add my recipes to your own meal planner. It's pretty awesome. I think you will love it as much as I do! Here's an example:


Lastly, I got a new camera!!! I am still learning how to use it and since I haven't been cooking I haven't had any practice with shooting food, but I am so excited and that also means I have another item to cross of my 101 list. Speaking of my list...I have been able to cross off quite a few goals and I am thinking of things to add for next year. Have you made any resolutions for the new year?

Stumble Upon Toolbar

Thursday, December 24, 2009

Salted Fudge Brownies

Salted Fudge Brownies

Merry Christmas Eve!!! I figured the last thing I would leave you with before the holiday couldn't be some manly chicken wings. If you're still searching for a delicious treat to make, I strongly recommend these brownies. I was given the task of coming up with a chocolately dessert to serve for my mom and sister this evening. I've been stressing about it for a week, but once I cam across this recipe, I knew my search was over. I loved the salty, crunchy contrast with the not too sweet brownies. However, I would make one change next time and add a bit of coffee flavor to the batter a la Ina Garten to bring out that amazing chocolate flavor even more. The brownies are just the way I like them, thick and fudgy and oh so decadent. Again, there is an amazing contrast with that sea salt in the batter. If you're a bit daring, sprinkle a bit more sea salt on the finished product. I promise, you won't be sorry. Alright, now it is really time to wish you all a happy holiday and a fabulous time with family and friends. I hope my Christmas miracle is a new fridge so I can bring you some fun things next week!


Salted Fudge Brownies
(Adapted from Food & Wine, December 2007)


Makes 16 servings

1 1/2 sticks unsalted butter
2 ounces unsweetened chocolate, finely chopped
1/4 cup plus 2 tablespoons unsweetened cocoa
2 cups sugar
3 large eggs
1 1/2 teaspoons pure vanilla extract
1 cup all-purpose flour
1 teaspoon (approximately) coarse sea salt

Preheat the oven to 350 degrees. Line a 9-inch square metal cake pan with foil, draping the foil over the edges. Lightly butter the foil.

In a large saucepan, melt the butter with the unsweetened chocolate over very low heat, stirring occasionally. Remove from the heat. Whisking them in one at a time until thoroughly incorporated, add the cocoa, sugar, eggs, vanilla and flour. Pour the batter into the prepared pan and smooth the surface. Sprinkle the salt evenly over the batter. Using a butter knife, swirl the salt into the batter.

Bake the fudge brownies in the center of the oven for about 35 minutes, until the edge is set but the center is still a bit soft and a toothpick inserted into the center comes out coated with a little of the batter. Let the brownies cool at room temperature in the pan for 1 hour, then refrigerate just until they are firm, about 1 hour. Lift the brownies from the pan and peel off the foil. Cut the brownies into 16 squares. Serve at room temperature.

Printable Recipe

Stumble Upon Toolbar

Wednesday, December 23, 2009

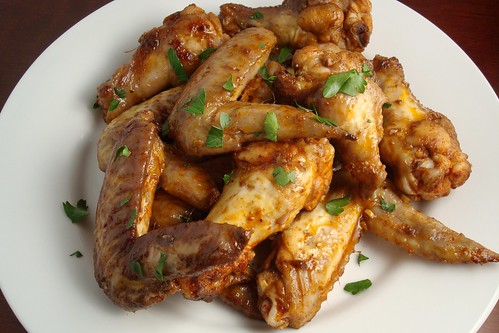
Garlic-Sizzled Chicken Wings

Garlic-Sizzled Chicken WIngs

My dear friends. I must apologize for the lack of posts on here lately. I'm officially on my winter vacation and it's grand, but I am currently dealing with a broken refrigerator in my apartment! I had so many cooking projects I wanted to get done during this time, but now it looks like they will have to wait until I get back from my mini vacation to Santa Barbara this weekend. I hope you're all enjoying the holiday season. It always takes me a while to get in to the spirit of things, but I find that viewing such holiday classics as Love Actually and A Christmas Story, always help to get me in the mood. It also helps to make such festive and delicious dishes like these chicken wings. If you're looking for something amazing to serve at your holiday party, try these. They are so garlicky (especially since I upped the amount of garlic), but if everyone else at the party is eating these as well, you won't need to worry about crazy garlic breath!

Anywho, I hope you all have a wonderful holiday and spend the time with the people you love. Happy Holidays!! xoxo

Garlic-Sizzled Chicken Wings


Garlic Sizzled Chicken Wings
(Slightly adapted from We Are Not Martha who adapted from Sea Salt With Food)


2 pounds chicken wings
Kosher salt
Freshly ground black pepper
2 1/2 teaspoons paprika
1/2 teaspoon Aleppo pepper
13 cloves garlic (3 whole, 10 chopped)
5 tablespoons olive oil
1 bay leaf
1/4 cup red wine

Rub the pieces of chicken with salt, pepper, paprika, and Aleppo pepper.

Smash three of the garlic cloves. Heat the oil in frying pan and add chicken and the three smashed garlic cloves and bay leaf. Fry until the chicken is golden.

Add the remaining chopped garlic and continue frying. Add the red wine and continue cooking until most of the liquid is absorbed and the chicken is tender, about 20 minutes.

Sprinkle with chopped parsley and serve warm.

Printable Recipe

Stumble Upon Toolbar

Friday, December 18, 2009

Cheddar Bacon and Caramelized Apple Pizza

Cheddar Bacon and Caramelized Apple Pizza

So..um, yeah...you can just go ahead and start calling me Kevin since I have all these pork recipes. What can I say? I was rooting for the guy all season and I wish he had won. Anyway, I won't go as far as to have pigs tattooed on my being, but I love me the pork. I recently came across a photo on Food Porn Daily and knew I had to come up with something that could replicate the porky, sweet, deliciousness before my eyes. This was pretty simple to come up with though I wish I had used white cheddar for the sharpness as well as it's beauty. I loved the tangy cheddar, smoky bacon, and sweet, sweet apple combo though. It can definitely be strange if you tell people that this is the kind of pizza you're making, but believe me it works. The one downside was that in my haste to make the crust, it didn't really rise as much as I wish it would have for this kind of pizza. It was still good, although a little messy to consume. Now that I have a couple balls of extra pizza dough, I am already thinking of what I can do next...


Cheddar Bacon and Caramelized Apple Pizza


Cheddar Bacon and Caramelized Apple Pizza
(Inspired by Food Porn Daily)


1 ball pizza dough
Caramelized apples (recipe below)
4-5 slices cooked bacon
Shredded sharp cheddar cheese
Extra virgin olive oil as needed

Preheat the oven to 450 degrees and line a baking sheet with parchment paper.

Roll out the dough to your desired thinness. Spread the caramelized apples on an even layer over the dough. Top with the cheese and then the bacon. Bake 10-15 minutes until the cheese is melted and bubbling. Serve warm


Caramelized Apples
(Adapted from Recipe Girl)

3 tablespoons unsalted butter
3 apples, peeled, cored and diced
1/4 cup plus 2 tablespoons white granulated sugar
3/4 teaspoon cornstarch
3/4 teaspoon ground cinnamon
1/8 teaspoon salt

In a large skillet over medium-heat, melt butter. Add apples, sugar, cornstarch, cinnamon, nutmeg and salt. Let apples cook and caramelize, about 15 minutes, stirring every so often (reduce heat as needed). Remove skillet from heat and set apples aside to cool.

Printable Recipe

Stumble Upon Toolbar

Wednesday, December 16, 2009

Pumpkin Bread with Cinnamon Cheesecake Layer

Pumpkin Bread with Cinnamon Cheesecake Layer

Over the last year plus of food blogging and two plus years of reading food blogs, I have saved A LOT of recipes. Sometimes, they fall by the wayside never to return again and sometimes, I just can't get them out of my head. This is one of the ones I couldn't get out of my head. I'm almost embarrassed to admit how lazy I was this past weekend. It was one of the first weekends in recent memory, I had no responsibilities with work and all the rain and the fact that I finally (briefly) had heat in my apartment made me not want to leave besides going to the gym. I wasn't a total hermit all weekend. I managed to get out and socialize for a bit on Saturday night and then returned home to the warmth in my apartment...before the pilot light went out again. Anyway, I baked up this bread before I went out and it's just like heaven in a bread pan. It takes about two minutes to whip everything together and you really don't need to use a stand mixer, but it sure makes life even easier. The bread is moist and not too dense and the cinnamon cream cheese is swoon worthy. Like the greedy pig I can be, I wanted to eat the whole thing myself, but out of the goodness of my heart, I shared it with my work friends...I can be generous like that.

Pumpkin Bread with a Cinnamon Cheesecake Layer
(Adapted from Culinary Concoctions by Peabody)


Cheesecake Layer:
8 ounces cream cheese, at room temperature
Scant 1/4 cup granulated sugar
1/4 cup brown sugar
1 teaspoon (approximately) ground cinnamon
1/2 teaspoon vanilla extract
1 tablespoon flour
1 large egg

Pumpkin Bread:
2 cups all-purpose flour
1 teaspoon baking soda
1/2 teaspoon salt
1 teaspoon ground cinnamon
1 cup pumpkin puree
1/2 cup canola oil
2 large eggs
1 1/2 cups granulated sugar

Preheat oven to 325 degrees. Lightly grease and flour a 9x5-inch loaf pan.

In a medium mixing bowl, combine all the cheesecake ingredients; beat until smooth and creamy, about 2 minutes. Set aside.

In another bowl, sift together flour, baking soda, salt, and cinnamon; set aside.

Place pumpkin puree, vegetable oil, eggs and sugar in a mixing bowl of an electric stand mixer. Using the paddle attachment, beat for about 1 minute, until fully combined. Add flour mixture into the pumpkin mixture and mix just until combined.

Pour half of the pumpkin bread batter into the loaf pan. Spoon cream cheese mixture on top of pumpkin batter layer and then pour on the remaining pumpkin batter.

Bake for 50 to 60 minutes, or until a wooden skewer inserted into center of the loaf comes out clean. Cool bread in pans for 10 minutes. Remove bread from pans and place on a wire rack to cool completely. Serve at room temperature or cool.

Printable Recipe

Stumble Upon Toolbar

Tuesday, December 15, 2009

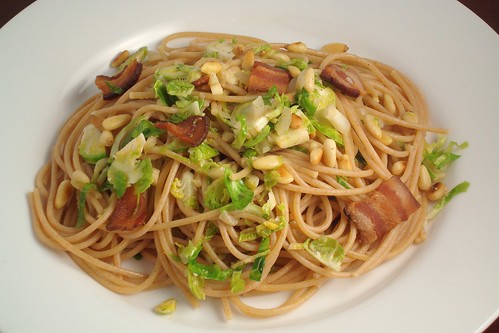
Pasta with Shaved Brussels Sprouts and Bacon

Pasta with Shaved Brussels Sprouts and Bacon


Well, as I mentioned yesterday, pork has been heavily featured in my "diet" lately. Last week I was cooking up a storm. Partly to have some work lunches and partly to heat myself up in LA's super cold temps. A lot of my posts lately seem to come from The Kitchn. They always seem to know what I want to eat and this was no exception. I had recently picked up some wonderful brussels sprouts at the Hollywood farmers market. Unfortunately for me, I don't own a large food processor or mandoline so the main task was shredding the sprouts with just my knife, but I tried to make it fun by playing dance music and got the task over with in no time. I have only truly enjoyed brussels sprouts by roasting them in the recent future, but I have to say, pork fat and crunchy pine nuts add a nice layer. I would definitely add some balsamic vinegar to this mix for a nice tangy note the next time I make it, but this dish as is with a little sprinkle of Parmesan got a thumbs up from my work colleagues (something which always seems to justify my cooking).


Spaghetti with Shaved Brussels Sprouts and Bacon


Pasta with Shaved Brussels Sprouts and Bacon
(Lightly Adapted from The Kitchn)


Makes about 3 servings

1 pound brussels sprouts, shredded
1 tablespoon olive oil (as needed)
4 pieces of bacon, sliced
2 shallots, thinly sliced
2 cloves garlic, minced
1/4 cup chicken broth
1/2 pound spaghetti
2 tablespoons pine nuts, toasted
Salt and pepper

Bring a large pot of water to boil. Season generously with salt.

Heat a large skillet over medium-high heat. Add the bacon and cook until fairly crispy and cooked through. Clear some space in the middle of the pan and add the shallots and garlic. (If you don't have enough room in your pan to create space, you can remove the bacon with a slotted spoon and add it back in when you add the sprouts.) Cook for about 5 minutes, until the shallots are soft.

While the shallots are cooking, add the pasta to the boiling water and cook until al dente.

Add the brussels sprouts and the chicken broth to the large skillet, season with salt and pepper, and toss all of the ingredients together. Cook, tossing occasionally, until the brussels sprouts are tender but not too soft, about 5 minutes.

When the pasta is finished cooking, drain and add it to the skillet. You can add a splash of the pasta water (or more broth) if the mixture seems dry. Add the pine nuts, toss everything together, season to taste, and serve.

Printable Recipe

Stumble Upon Toolbar

Monday, December 14, 2009

Pork Meatballs with Lemon and Thyme

Pork Meatballs with Lemon and Thyme


Lately I have been eating quite a bit of pork. The other white meat is satisfying and I am finding great simple ways to prepare it. For example, these meatballs. They are quite awesome and kind of fun for a weekend project. My last couple of weekends have been kind of lazy so it's nice to have the occasional side project to work on. I am looking forward to my upcoming break to get some more cooking projects completed. Anyway, I made these a little over a week ago. I feel bad for not sharing them sooner because they are really good. At first, I was a little shocked by the lemony sauce, but after a couple of bites it became quite addictive. Also, you should know that the sage flavor is quite strong and adds a great savory dimension to the meatballs. My regular bread crumbs were not good so I ended up using panko which was fine. I served these with the garlic rice I mentioned in my last pork post. I am quite obsessed with it lately. This was perfect for a couple of work-week lunches and the leftovers only got better. Not that I am counting or anything, but I only have four and a half more working days before my two week break!! I am collecting tons of recipes to make during my time off. If you have any great suggestions, leave them in the comments.


Pork Meatballs with Lemon and Thyme
(Adapted from The Kitchn)

Makes 2 generous servings

For the meatballs
1/4 cup milk
2 tablespoons breadcrumbs
1/2 small yellow onion, finely diced
Extra-virgin olive oil
Salt
1/2 pound ground pork
1 egg, beaten
2 tablespoons freshly grated Parmesan cheese
2 tablespoons chopped fresh sage leaves
1/2 teaspoon finely chopped fresh thyme
1/8 teaspoon cayenne pepper
Freshly ground black pepper

For the Lemon Thyme Sauce
3/4 cup chicken broth
6 tablespoons dry white wine
2 tablespoons fresh squeezed lemon juice (from one lemon)
1 1/2 teaspoons chopped fresh thyme
Zest of 1/2 a lemon, to garnish
Roughly chopped thyme, still on stems, to garnish

To make the meatballs:
Put the milk and breadcrumbs in a small bowl and mix with a fork. When the crumbs have softened squeeze out the milk and discard it.

Gently sauté the onion in a little olive oil until it is soft but not colored. Season with a pinch of salt and set it aside to cool.

Combine in a medium bowl the pork, breadcrumbs, onion, half of the beaten egg, Parmesan, sage, thyme, cayenne, black pepper, and 1 teaspoon salt. Mix with hands thoroughly.

Shape the mixture into walnut-sized balls. This can be done several hours or even a day ahead.

To cook, heat a skillet large enough to hold all the meatballs in one uncrowded layer. Add a little olive oil. When the skillet is heated, add the meatballs, shaking the pan to keep them from sticking. Using tongs to turn so they brown evenly, cook the meatballs until they are no longer pink in the center and lightly browned on all sides. Remove from the pan to a plate and immediately make the sauce.

To Make the sauce:
Remove meatballs from the pan, and deglaze it over medium heat with the chicken broth and wine. Simmer until reduced by at least a third. Add the lemon juice and thyme, then add the meatballs back in again as well.

Simmer until ready to serve - at least 10 minutes, but up to half an hour. Serve meatballs with the sauce poured over and garnished with lemon zest curls and thyme sprigs.

Printable Recipe

Stumble Upon Toolbar

Wednesday, December 9, 2009

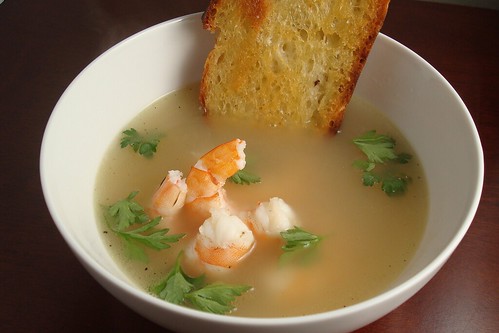
Garlic Soup with Shrimp

Garlic Soup with Shrimp

Baby it's cold outside!! I think Mary said it best yesterday, but we here in LA are weather wimps!!! The heat currently is not working my apartment and the last two nights I have slept with a quilt, a blanket, socks, a turtleneck, a hoodie and a SNUGGIE!! (Proof is here) Seriously. I am so in love with the Snuggie. One of the best presents ever (thanks Glen!!). Anyway, it started cooling down over the weekend and I knew I desperately needed some soup to warm myself up. I knew I would want some bread with it so I whipped up a batch of no knead bread. It's been a while since I have made it, but honestly, making that bread is like riding a bicycle. You never forget. This soup is quick cooking so you will be warmed up in no time. I am a huge fan of clear broth soups versus the chunky stuff so this is right up my alley. I think next time I will cook the garlic with the broth to give the broth more garlic flavor, but the sweet garlic was great with the toasty bread and shrimp. I could slurp this down all day. I may need to if that heat never gets turned on!!

Garlic Soup with Shrimp

Garlic Soup with Shrimp
(Adapted from Mark Bittman)

Makes 2 servings

2 tablespoons extra virgin olive oil
8 medium to large cloves garlic, peeled
Salt and freshly ground black pepper to taste
2 thick slices French or Italian bread
3 cups shrimp stock, chicken stock, water or a combination
10 large shrimp, peeled (deveining is optional)
Minced fresh parsley leaves for garnish (optional)

Combine olive oil and garlic in a deep skillet or broad saucepan and turn heat to medium. Sprinkle cloves lightly with salt and pepper, and cook, turning occasionally, until they are tender and lightly browned all over, about 10 minutes; lower heat if they seem to be browning too quickly. Remove garlic with a slotted spoon.

Turn heat to low and add bread; cook on each side until nicely browned, about 4 minutes total. Remove bread, add stock and raise heat to medium high.

When stock is nearly boiling, add shrimp and salt and pepper to taste. Cook until shrimp are pink, about 2-4 minutes. Place a piece of bread and some garlic cloves in each bowl; then ladle in a portion of soup and shrimp. Sprinkle with parsley and serve.

Printable Recipe

Stumble Upon Toolbar

Tuesday, December 8, 2009

Brown Sugar and Dijon Glazed Pork Loin

Brown Sugar and Dijon Glazed Pork Loin

We finally have winter in Los Angeles!!! Well, at least what I consider winter while living here. It has me craving all sorts of warming foods and it is finally not torturous to turn on the oven. Late last week when I was prepping for the Eat My Blog bake sale, I realized I would need something to eat besides brownie batter. As I prepped the brownies, I cooked up this pork loin which was a satisfying and insanely easy dinner. Speaking of Eat My Blog, we made over $3000 for LA Regional Foodbank! How cool is that!!?? I can't wait to do it again next summer. I also had way too much fun hanging out with Sonja, Gaby, Nastassia, and HC. Guys, I think we need another Marix meet up, ASAP. Anyway, this pork was so easy to prepare. I served it with some rice cooked with some garlic and chicken stock. That rice is my new favorite thing... The pork is a great combo of sweet and tangy with the spicy dijon pairing perfectly with the sugar. I can't wait to try this again.


Brown Sugar and Dijon Glazed Pork Loin
(Adapted from Rock Recipes)

Pork loin
Salt and pepper
Dijon mustard
Dark brown sugar

Preheat the oven to 425 degrees and line a baking sheet with foil. Season the pork loin with salt and pepper and open roast the pork on a rack for 30 minutes.


Brush the entire surface of the roast with the Dijon, then press brown sugar into the mustard, all over the roast. Return the roast to the oven, reduce the heat to 375 degrees. Continue to roast until the internal temperature of the roast hits 145-150 degrees on a meat thermometer. Baste the roast in the drippings/sauce several times during the cooking time. Let the roast rest for 10 minutes before carving and serving.

Printable Recipe

Stumble Upon Toolbar

Monday, December 7, 2009

Kale Salad with Spicy Peanut Dressing

Kale Salad with Spicy Peanut Dressing

A few months ago, I discovered a really awesome kale salad at Whole Foods courtesy of M Cafe de Chaya. It was so good, I was literally having it for breakfast, lunch and dinner. I never really thought to try and recreate it on my own until I came across this recipe on The Kitchn. Post-Thanksgiving I was really in the mood for simple, fresh food. I didn't over indulge this year, but I still wanted something light after a day of traveling. This salad is really close to that Chaya version and doesn't weigh you down. The only thing is that I wish I had more of the dressing to really coat everything. If you make this, I strongly suggest that you double the recipe for the dressing. I gobbled this just as willingly and without shame as the Chaya version. It's such a great salad recipe, I will probably be having this at least once a week while kale is in season.

Kale Salad with Spicy Peanut Dressing


Kale Salad with Spicy Peanut Dressing
(Adapted from The Kitchn)

Makes 2 large servings

1 large bunch curly or lacinato kale
1 large carrot, peeled
6 tablespoons roasted, salted peanuts, divided
2 tablespoons vegetable oil
1 1/2 tablespoons cider vinegar
1 1/2 teaspoons packed brown sugar, or more to taste
1/4 teaspoon coarse salt
Pinch red pepper flakes

Fold each leaf of kale in half lengthwise and slice out the center rib. Discard ribs. Roll a stack of the leaves up and slice in half lengthwise, then crosswise into very fine ribbons. Wash and rinse thoroughly in a salad spinner.

Slice the carrot very thin, either by creating curls with a peeler, or by running the halved carrot lengthwise down a mandoline. Toss with the kale and 3 tablespoons of the peanuts.

In a chopper or small food processor, briefly puree the remaining 3 tablespoons peanuts, oil, vinegar, sugar, salt and pepper flakes. Pulse it just a few times; the peanuts should be partially pureed, but with some nibs and nubs still left in the dressing. Taste and adjust the seasonings as necessary.

Toss the dressing with the slaw and let it sit for at least a few minutes before serving.

Printable Recipe

Stumble Upon Toolbar

Thursday, December 3, 2009

Eat My Blog Charity Bake Sale

Eat My Blog Postcard

Hey Angelenos, What are you all up to this weekend? In case you were wondering, the right answer is "I'm going to the Eat My Blog Bake Sale taking place from 10AM to 4PM at Zeke's Smokehouse in West Hollywood". What is Eat My Blog you ask? Well, I will tell you. A couple of months ago, a few fabulous LA bloggers got the idea to put on a bake sale with the proceeds being donated to LA Regional Foodbank. When they asked me to take part, I immediately said yes. We're all fortunate to surround ourselves with food and talk about it constantly, but there are many, many people right in our own backyards who go without. The LA Regional Foodbank has been distributing food since 1973. To learn more about the foodbank click here.

There will be a ton of wonderful LA foodbloggers participating in the event. I'll be making pumpkin swirl brownies and there is a huge list of all of the desserts here (including many with BACON!). Some wonderful companies are sponsoring the event including Challenge Butter and hot drinks from Coffee Bean & Tea Leaf. Again, the event goes from 10AM to 4PM and if you want to come say hello to me, I'll be working from noon to 4 with some of my Foodbuzz Festival partners in crime. So come on out, say hello, and help raise money for an amazing cause. See you there!

Stumble Upon Toolbar

Tuesday, December 1, 2009

Roasted Cauliflower Puree

Shrimp Over Roasted Cauliflower Puree

Last year I developed a deep and undying love for roasted cauliflower. I have been patiently waiting for cauliflower to be in season again and a few weeks ago, I got to put a different spin on it. I am not a fan of mashed potatoes, but I do love roasted squash or parsnips turned into a simple mash and then topped with some kind of protein. In this case, I decided to try my hand at mashing up the cauliflower and then added some simply cooked shrimp to the mix. Despite me eating many of the roasted cauliflower florets right off the pan, I still got enough to make the puree. I wanted to be simple and low calorie and fat, so instead of using cream, I just pureed them in a bit of water. Chicken or vegetable stock is a great alternative to the water. As always, roasting the cauliflower gives it a delicate, nutty flavor that just works perfectly with the light seafood, but I imagine this would be great with chicken or even a hearty meat instead of mashed potatoes.

Roasted Cauliflower Puree
(By Esi)

1 head cauliflower, cut into florets
Olive oil for coating
Salt and pepper to taste
Water as needed (or chicken stock or vegetable stock)

Preheat the oven to 400 degrees and line one or two baking sheets with foil.

In a bowl, toss together the cauliflower, enough olive oil to coat, and salt and pepper to taste. Spread the cauliflower onto an even layer on the baking sheets.

Roast 20 minutes. Using tongs turn the cauliflower on to the other side and roast another 15-20 minutes until browned.

Once the cauliflower has cooled slightly, turn it out into a food processor. Mash until you get a thick puree, adding water as needed. Serve warm.


Printable Recipe

Stumble Upon Toolbar